Basic Genoise Sponge Cake Recipe
Recipe by Sarah Phillips © 2000 Sarah Phillips CraftyBaking.com
Variations: Basic Genoise Cake with Added Butter; Basic Chocolate Genoise Cake; Madeleines; Raspberry Cloud Mini-Layer Cake
Cake and photo by Sarah Phillips © Sarah Phillips
What is Genoise Sponge Cake?
The Genoise, a basic and old-faithful cake of French Pastry Chefs, is a sponge type cake, also known as a foam cake. It is a classic, light and airy cake that uses air suspended in an egg foam, for its leavening, to give it volume. Other examples of sponge cakes are chiffon, angel food, and general sponge cakes. A genoise cake is made by beating warm whole eggs with sugar until the mixture more than triples in volume, then flour is folded in, which strengthens its foam. Sometimes melted butter is folded in the end for extra flavor. Some recipes use cake or all-purpose or cake flour or part cake and all-purpose flour.
The Best Genoise Sponge Cake Recipe and Techniques
After my testing and trying numerous Genoise cake recipes, and having them fail for one reason or another, and hearing similar complaints from other bakers, I set out to find out the best way to make them.
I found that the right recipe and mixing techniques are paramount, and could not find them together in one recipe. This resulted in my writing my own recipe, which includes lots of information often missing from others. Mine gives you spectacular results. Genoise cakes are all about technique, working quickly and steadily and, what I often say, is a little bit of luck, too. I have included a lot of descriptive technique information so you will be successful.
The beauty of sponge cakes, and especially genoises, are that they are versatile. Genoises can be served as a cake in itself, or cut into thin layers used to form the base of countless cakes or filled and stacked. Genoise cakes are often baked in large, thin layers and then filled and rolled. Its tight, springy and somewhat dry texture allows to take on numerous flavors because it can readily absorb flavored sugar syrups or liqueurs, without becoming too wet and losing its delicate texture.
CAKE RECIPE HELP
Secrets
My recipe uses more eggs than a typical Genoise and all-purpose flour. I found this results in a better and more stable cake structure. And, its paramount to beat the egg yolks and sugar properly to get the best results; many recipes do not adequately describe how to or have you under-beat the eggs and sugar, which I believe results in lots of failures. My version produces a high-rising and successful Genoise Cake, which gives spectacular results.
INGREDIENTS
unbleached or bleached all-purpose flour: 1 cup (spoon flour into measuring cup and level to rim) - I used unbleached ap flour / 4.41 ounces / 125.02 grams
salt: 1/2 teaspoon / 3 grams
eggs: 6 large / 10.5 ounces / 300 grams
regular or superfine table sugar: 3/4 cup - I used regular table sugar / 5.25 ounces / 150 grams
vanilla extract: 1 teaspoon / 4 grams
EQUIPMENT: 325 watt KitchenAid mixer or greater
INSTRUCTIONS
1. Position a rack in the lower third of the oven and heat the oven to 350 degrees F. (Do NOT reduce the oven heat by 25 degrees F if using a dark, nonstick pan.) Generously grease an 8- or 9 x 2-inch pan, line with parchment paper, and grease its surface. Dust the interior with flour, and tap out the excess. Set aside.
SARAH SAYS: I used an 8 x 2-inch dark, nonstick pan for this recipe and did not reduce the oven temperature by 25 degrees F. But, for thinner layers, split the batter between, 2, 8 x 2-inch pans, if desired. Reduce the baking time slightly if you do.
2. Combine the flour and salt, and then, sift into a medium-size mixing bowl.
3. Hand-whisk the eggs and sugar together in the mixer bowl, with a large balloon whisk. Place the bowl over a pan of simmering water, taking care not to touch the water, and, whisking steadily, heat the mixture about 2 to 4 minutes, until it is foamy, slightly pale, and reads 110 to 120 degrees F on an instant-read thermometer. Remove the bowl from the water immediately, and dry the bottom.
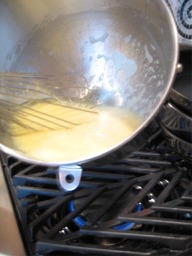
SARAH SAYS: A technique I use when warming the eggs and sugar, is to turn a stove burner on low, and then continually rotate the bowl's bottom over the burner, while whisking. Be careful, because the handle of the bowl gets hot! Hold it with a kitchen mit.
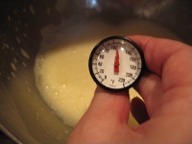
Hot Tip: From time to time during cooking, measure the temperature of the eggs and sugar with an instant read thermometer. To measure, remove the bowl from the stove or the simmering water, stir the mixture and, place the end of the thermometer half way in, making sure you don't touch the bottom of the bowl.
SARAH SAYS: Warming the ingredients simply helps dissolve the sugar better and improves the emulsifying properties of the eggs. As a result, it helps them reach maximum volume when beaten. Make sure the sugar is dissolved by rubbing a small amount of mixture in between your fingers. It should not be sandy. If it is, stir rapidly until the sugar is thoroughly dissolved. I like to use superfine sugar because it dissolves faster than regular table sugar. It's very important because if the sugar is NOT dissolved all the way, the egg structure won't be done correctly.
4. Beat the warmed egg and sugar mixture for a total of 8 to 10 minute or until it becomes thickened. The egg foam passes through various stages - it first becomes foamy, then light and aerated and finally it thickens.
A. Fit the bowl to a mixer fitted with a whisk attachment.
B. Add the vanilla extract.
C. Beat the mixture on medium-high speed (speed #8 on a KitchenAid 325-watt mixer), until it cools to room temperature, triples in volume, the sugar is completely dissolved and is pale yellow in color, taking about 8 to 10 minutes. It should then ribbon.
SARAH SAYS: The egg foam passes through various stages during beating - it first becomes foamy, then light and aerated and finally it thickens. Take the time to do this carefully. During the last four to five minutes of beating, stop the mixer from time to time and test the mixture for ribbon thickness.
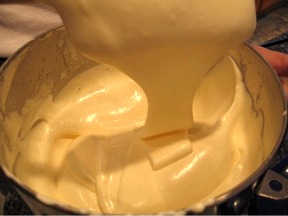
When the mixture ribbons, it should fall from its beaters or a rubber spatula, and hold together like a sheet of batter and then, fall very slowly into a thick ribbon
back into the mixing bowl.
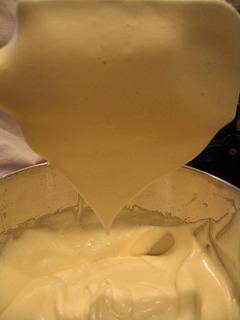
The ribbon will sit on top and then, spread slightly and then, slowly flatten as it dissolves. The ribbon will still have some definition to it in the bowl.
SARAH SAYS: This is a very important step. Take the time to do this carefully. During the last four to five minutes of beating, stop the mixer from time to time and test the egg yolk/sugar mixture for ribbon thickness. If the mixture is under whipped, the genoise will be dense. Be careful not to overbeat, either.
5. Sift 1/3 of the flour evenly over the batter. With a large rubber spatula, gently fold it into the beaten egg mixture so most of it is no longer visible - it's ok to have some wisps of flour showing. Repeat two more times. With the last addition of flour, make sure there is no flour or flour streaks visible in the batter. Take care to handle the batter gently in order to maintain its bubble structure. Be patient; it takes awhile to fully fold in the flour.
At the end of folding, with your index finger and thumb, gingerly reach inside the batter to the bottom of the bowl and feel for any flour lumps. To get rid of them, press the lump between your thumb and fingertips. If you can't break it up, simply remove the lump from the batter and discard; it will not dissolve during baking, but rather harden. If you start to deflate the batter too much during this procedure, stop immediately. Finish with one or two folding motions with your large rubber spatula. If you removed a tablespoon of flour lumps at the bottom of the bowl, replace it by sifting 1 or 2 tablespoons all-purpose flour over the batter and fold until incorporated.
SARAH SAYS: Use a large rubber spatula, about 2 3/4-inch wide, and fold the flour and beaten egg mixture with large strokes. This helps the flour to incorporate more easily, otherwise the cake will be grayish, not rise as high and have flour lumps. During folding, the batter will lose some volume, which shouldn't jeopardize the finished cake, unless you deflate it too much from over-handling. Make sure you get all of the flour folded in and scrape the bottom of the bowl as you do. I found clumps of flour hiding at the bottom of my mixing bowl, and I really made sure I got it all.
6. With a large rubber spatula, immediately push the batter into the prepared 9-inch pan. (To push, hold the mixing bowl and tilt it until its top rim matches up to the rim of the baking pan. Then, push the batter with a large rubber spatula into the pan.)
The batter will fill the pan 3/4rds full or almost to its rim. Place the baking pan on a foil-lined baking sheet, in case there are any spill-overs. Run a table knife through the batter in an "s" shape before baking the cake to get rid of large air bubbles. Gently smooth the batter so it is even. (If you frequently encounter lots of spill-overs with this cake, you can bake it in 2, 8 x 2-inch pans, instead. Reduce the baking time by a few minutes.)
Immediately place the filled pan in a well-preheated oven and bake for 20 to 25 minutes, or until the top is golden brown, the sides are pale golden in color, and the cake is springy to the touch. It should shrink slightly from the sides of the pan. Do NOT open the oven to check on the cake until 5 minutes before the minimum baking time, or risk a fallen cake.
7. Transfer the cake to a cooling rack; unmold after 5 to 7 minutes - do not let it sit any longer in its pan or it may sink in the middle. With a small metal spatula or table knife, loosen the sides of the cake and unmold at once. Carefully remove the parchment paper. Turn the cake right-side-up to cool to room temperature on the rack.
Variations of the Genoise Sponge Cake
Basic Genoise Cake with Added Butter
Add in 4 tablespoons unsalted, melted and cooled butter to the recipe, above. It lends a buttery flavor to the cake. The cake will not rise as high because butter is a fat, and weighs down the recipe somewhat. (*See Butter Variation, below)
The recipe with the butter takes about 25 to 30 minutes to bake.
In Step #2, do the following: After you combine the flour and salt, melt the butter after measuring and set it aside to cool - it should be just barely warm, but still fliud, when you’re ready for it.
Add this step after Step #5 and before you deposit the batter in the pan and bake it in Step #6 - If using melted butter, make sure it has cooled sufficienty. Transfer it to a large mixing bowl. Gently push about 1 cup of the folded batter into the melted butter, and fold together. This lightens the butter and makes it easier to incorporate the rest of the batter with it. Add the rest of the batter to the small amount of batter/melted butter mixture in the mixing bowl, and fold together with a large rubber spatula. Push the batter with a large rubber spatula into the other mixing bowl. The batter is delicate at this point, so fold gingerly, to the point where you can't see the butter AT ALL without over-mixing.
With a large rubber spatula, immediately push the batter into the prepared 9-inch pan. (To push, hold the mixing bowl and tilt it until its top rim matches up to the rim of the baking pan. Then, push the batter with a large rubber spatula into the pan.)
If butter has collected at the bottom of the bowl, do not add it to the batter in the pan; it will retard the rising of the cake. Bake as instructed.
SARAH SAYS: The melted butter will cause the batter to deflate somewhat. Don't despair. This is the most delicate operation you have to perform.
*Butter Variation: If you brown the butter (called Beurre Noisette or Brown Butter) and strain it (clarify), it gives a wonderful nutty flavor to the cake. To Brown Butter: Increase the unsalted butter amount to 5 tablespoons to end up with 4 tablespoons, clarified. After the butter melts, keep heating it under low heat, and let the solids drop and brown to a dark color. (The solids will quickly burn, so watch its progress.) Remove it from the heat immediately and pour the clear fat through a fine strainer, into a large mixing bowl for use in the recipe.
Chocolate Genoise
Replace 1/4 cup flour with 1/4 cup Natural or Dutch-processed cocoa powder
Increase the regular or superfine sugar to 1 cup total or 7 ounces / 200 grams
Madeleines
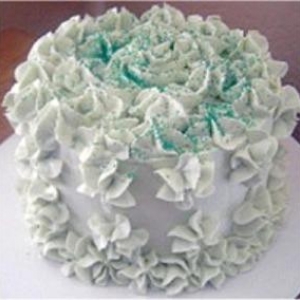
Raspberry Cloud Mini-Layer Cake
BAKING PHOTOS: I chose not to add butter to the recipe. But, it is optional.
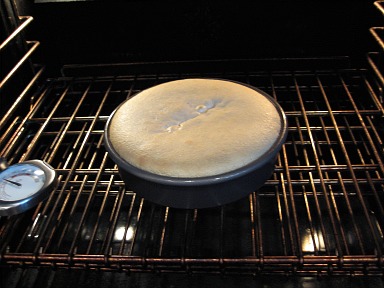
The cake is rising above the rim of the pan really fast. It's been in the oven for 5 minutes. At 10 minutes into baking, the top of the cake is browning much too fast on top, and the cake is puffing way up on the sides. The oven thermometer still reads 350 degrees F. Butter holds things down, so to speak, so the high heat (the nonstick pan combined with not lowering the heat by 25 degrees F) plus not having butter in the recipe, is making the cake puff up more than usual. I did grease the entire pan with Baker's Joy, a combo of vegetable oil spray and flour, because there isn't any butter in the recipe. The middle still has not caught up to the puffed sides.
At 15 minutes into baking, the middle is starting puff and to catch up to the puffed sides. My oven is still right on the 350 degree F mark as measured with my Taylor Oven Thermometer. The top is starting to set. There's about 5 to 8 minutes to go.
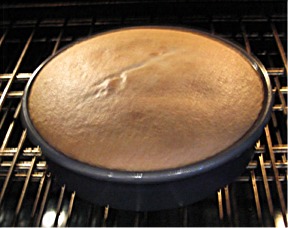
At 18 minutes into baking, the middle has caught up to the puffed sides, much like a buttercake bakes.....The top of the cake is puffed up in a slightly domed shape much like a buttercake top. At 22 minutes baking time, the cake has a nice dome to it. I removed it from the oven.
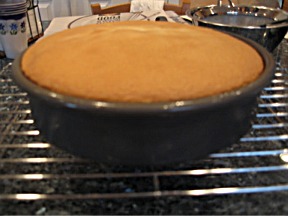
The cake is now cooling. The entire top is starting to fall a little - it's normal. The cake smells wonderful. I set my timer to 5 minutes, the time suggested to let it cool in the pan before unmolding.
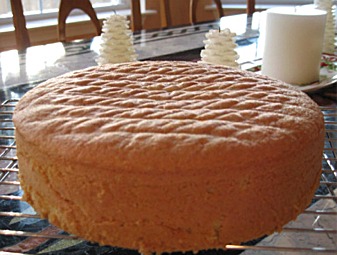
At 5 minutes cooling time, the cake top settled down a little bit with a nice flat top, has a nice spring to it when touched, and did not dip in the middle. The cross marks on top of the cake were made as a result of inverting the cake from the wire cake rack. The cake is a beautiful height and sturdy. It's springy to the touch. The cake unmolded easily from its pan.
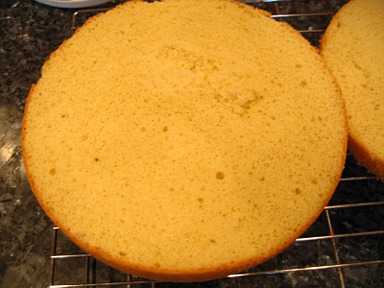
I torted the cake in three layers. It's baked all the way through, but not overdone, either. Inside it has a coolness to the touch from some moisture being present like a slightly moist sponge, has tons of tiny, tiny air bubbles, and each layer can be picked up without much support because the cake doesn't crumble - it holds together like a sponge.
The layers would definitely benefit from a soaking syrup for moisture because, after the first bite, the texture gets kind of dry dry and spongy, but not overly so! It has a nice smell and flavor. (The nick or hole in the middle of torted layer - near 2 o'clock on the cake - came from me recutting!....)
FLAVORED SUGAR SYRUP
If flavoring with sugar syrup: Trim the top and bottom of cooled cake's crust. Sprinkle the syrup evenly on both sides. Place on wire cake rack and let sit for a day before using; this lets the flavors develop and the syrup to be more evenly distributed.
INGREDIENTS
1/4 plus 1 1/2 teaspoons sugar
1/2 cup water
2 tablespoons liqueur of your choice
INSTRUCTIONS
Bring the sugar and water to a rolling boil, stirring constantly. Remove from heat, pour into a heat-proof liquid measuring cup, cover with plastic wrap and let cool completely. Stir in the liqueur. If it does not equal 3/4 cup, add enough warm water, and stir completely. Let cool before using.
STORAGE
Without the syrup: When cool, place the cake in airtight plastic bags to keep it from drying. Store 2 days at room temperature, 5 days refrigerated or frozen for a month or two. When a genoise is stored in the refrigerator, its skin becomes soft. Remove before using.
After adding the syrup: Let cake sit for a day to absorb. Then, cake can be stored for up to 5 days in the refrigerator or frozen, for 1 to 2 months.
Other Recipes
Ultimate Pistachio Butter Cake or UPBC
10373 views| 0 comments

Italian Cassata alla Siciliana Cake
33621 views| 6 comments

Lemon Coconut Mini-Cakes
13828 views| 20 comments
My Recipe Tools
Explore How-Tos

Cakes - Upside Down Smooth Icing Technique
By Jeff Arnett, posted with permission; Photos edited by Sarah Phillips Cake and photo by J... Read More

Thickeners - Tapioca
Tapioca is made from starch extracted form the root of the cassava plant, also called manioc or... Read More

Eggs - Cooking Techniques for Safe Soft Meringue
Raw eggs and/ or separated yolks or whites are used in many recipes that are not baked. There is... Read More

Frosting or Icing, Fillings and Glazes Types
Go to Types - Frosting or Icings, Fillings and Glazes Read More
Newest Recipes View All

Priscilla’s Fudge Sauce
INGREDIENTS 4 tablespoons unsalted butter 4 ounces bittersweet chocolate, chopped 1 cup sugar 1/2... Read More

Candied Spiced Pink Grapefruit Peels
INGREDIENTS 2 large pink or red grapefruits, preferably organic 1 cup granulated sugar, plus... Read More

Vanilla scented biscuit roulade
About Us

Hi, I'm Sarah Phillips Sarah Phillips, CEO and founder of craftybaking.com, has over 25 years of extensive professional real time baking experience. READ MORE

Hi, I'm Kelly Hong Contributing Editor, Food Stylist and photographer, since 2007. I have been working as a professional ceramic artist for over 25 years. READ MORE