Millefiori Slice and Bake Cookies
Recipe by Sarah Phillips; Food styling and photos by Kelly Hong © 4-8-2015 Sarah Phillips CraftyBaking.com

For this tutorial, we employed the technique to cookie dough used to make millefiori glass canes which produces distinctive decorative patterns on glassware. More recently, the millefiori technique has been applied to polymer clay and other materials. As the clay is quite pliable and does not need to be heated and reheated to fuse it, it is a much easier medium in which to produce millefiori patterns than glass.
Keep in mind that employing this technique and applying it to cookie dough and then baking it, took us hours and hours to figure out how to do it.
I had to develop a special cookie dough recipe that could be kneaded with color, bake without puffing or spreading, and then result in tender and buttery cookies when baked.
This tutorial is a showcase of engineering, art, and using specific cookie recipe development that is all rolled into one to create a stunning design in cookie dough.
You may alter the colors to fit any party theme, of course. The creative possibilities are endless.
COOKIE RECIPE HELP
Secrets
The flower shape is created by layering different color dough logs into a main log, then slicing the log into individual cookies to bake, revealing the design inside. This is a riff on the millefiori glass technique. The secret to this recipe's success is the use of the Vanilla Shortbread Cookie Recipe that I developed, which lends itself nicely to being tinted in various colors without disrupting the structure of the dough. The cookie dough does not puff or spread when baked.
INGREDIENTS
3 recipes Vanilla Shortbread Cookie Dough
Royal Blue Gel Paste food coloring; AmeriColor preferred
Yellow Gel Paste food coloring; AmeriColor preferred
Orange Gel Paste Food Coloring; AmeriColor preferred
Egg whites, reserved from making the cookie dough
Equipment:
Nonstick mat such as Silpat brand
Pizza cutter
Ruler
Sharp knife
INSTRUCTIONS
Here's what the project looks like. You will make two of these cookie dough rolls:

STEP I: PREPARE THE COOKIE DOUGH
1. Tint one recipe Vanilla Shortbread Cookie Dough with 4 drops Royal Blue gel paste food coloring, to make an AQUA color for the flower petals.
2. Tint another recipe Vanilla Shortbread Cookie Dough with 10 drops Royal Blue gel paste food coloring, to make a TEAL color for the center stripe and the outline of the flower petals.
3. Tint the last Vanilla Shortbread Cookie Dough recipe with 3 drops yellow gel paste food coloring, to make a YELLOW color for the outside of the flower and its center.
4. After you have tinted the three recipes of dough, wrap the aqua and teal doughs in plastic wrap, and place them in the refrigerator.
5. Cut off 3 ounces of the yellow dough, and wrap the remaining dough in plastic and put it in the refrigerator.
Flatten the three ounces of yellow dough and put 3 drops of orange gel paste food coloring in the center of the dough, fold the dough over, to enclose the food coloring, and knead the dough until the ORANGE color is evenly distributed.
The orange color is used to rim the center of the flower.
Wrap the orange dough and place it in the refrigerator with the rest of the doughs.


6. Let the doughs chill for one hour.
STEP II: CREATE THE COOKIE DOUGH FLOWER PETALS AND CENTERS LOGS
In general:
1. Remove the AQUA dough from the refrigerator, and cut it into 6 equal portions.
NOTE: the dough weighs approximately 24 ounces, so I made six 4 oz. sections of dough.
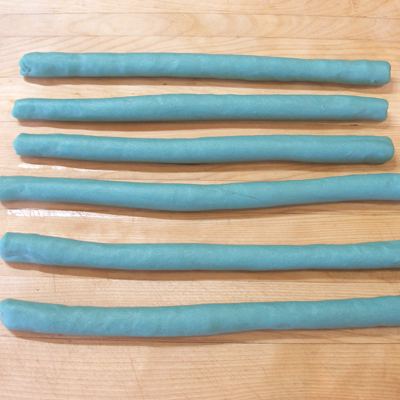
2. Roll the AQUA dough sections into logs the measure 12-inches long, and approximately 3/4-inches thick.
2. Create the yellow flower center .
Cut a 4 ounce portion of the YELLOW dough, and roll it into a cylinder that is 12-inches long, and 3/4-inches thick.

3. Put the AQUA and YELLOW logs on a baking sheet and put it in the freezer for 30 minutes, or until they are really firm.
Create the AQUA cookie dough petals with TEAL stripes logs = cookie dough flower petals:
1. After logs are chilled, remove one AQUA log from the freezer at a time, and cut the logs in half, to make 6-inch lengths.
After they are cut, cover and put each of the 6-inch logs back in the freezer.
You will have 12 6-inch AQUA logs and 2 6-inch YELLOW logs.

2. On a very lightly floured nonstick baking mat, roll out a small portion of the TEAL dough, and cut strips that are 6-inches long and 1/2-inch wide.
The thickness of the dough should be a bit thinner than 1/8-inch. I like to use a pizza cutter to help me with this job.

3. Remove one AQUA log from the freezer at a time, and insert, the TEAL petal center strip.
Using a thin sharp knife, cut a slit down the center of the log, being careful to not cut all the way through.

4. Gently open the slit with your fingers, and place the TEAL strip in the slot.


5. Gently squeeze the log together, then trim any excess TEAL off the top of the log.
Lightly roll the log to make sure the doughs adhere to each other.
When done, place the log back in the freezer, and repeat the steps with the rest of the AQUA logs.

Create the YELLOW cookie dough flower centers with ORANGE rims logs = cookie dough flower center logs:
1. Cut the ORANGE dough in half and roll one half out on a very lightly floured nonstick baking mat.
Trim the top edge and trim sides so the dough measures 6-inches wide, and at least 3-inches long.
The dough should be slightly thinner than 1/8-inch thick.


2. Roll the log up, encasing it in the orange dough.

3. Trim off the excess orange dough.

4. Gently press the orange dough together at the seam, and roll it on your work surface several times to seal.

5. Trim off the excess dough, making nice straight ends on the log.
Cover and place the yellow/orange flower center log back in the freezer and repeat the steps with the second yellow log.

Encase the cookie dough flowers petals in TEAL cookie dough = cookie dough flower petal logs:
1. Repeat the above steps with each of the 12 AQUA logs:
Cut the remaining TEAL dough in half and roll one half out on a very lightly floured nonstick baking mat.

Trim the top edge and trim sides so the dough measures 6-inches wide, and at least 3-inches long.
The dough should be slightly thinner than 1/8-inch thick.
Roll the log up, encasing it in the teal dough.
Trim off the excess teal dough.
Gently press the teal dough together at the seam, and roll it on your work surface several times to seal.
Trim off the excess dough, making nice straight ends on the log.

Once encased, return each of the petal logs back in the freezer.
*Make sure to keep all of the scraps of teal and aqua cookie dough because later you will be kneading them together to make the final layer of dough on the outside of the log.*
NOTE: If you cut the TEAL encasement too short, just roll out a snake of dough and fill the gap with it, as shown in the pictures below:


STEP III: CONSTRUCT THE COOKIE DOUGH FLOWER LOG
Construct the cookie dough flower log:
1. Remove 6 cookie dough flower petal logs and one cookie dough flower center log from the freezer and trim them with a sharp knife so they are all the same size.

2. Brush the cookie dough flower center log with the egg whites that you set aside when making the cookie dough.

3. Begin surrounding the cookie dough flower center log with the 6 cookie dough flower petal logs, one at a time, brushing egg whites between each log.
NOTE: Make sure the teal stripe in the center of the petal logs are perpendicular to the center log.

4. Gently press the logs together, to adhere.

Construct the outside yellow dough around the cookie dough flower log:
1. Roll out snakes of YELLOW cookie dough, then press one side so it comes to a point.


2. Brush a little egg white between the petal logs and press the pointy side of the yellow snakes into the gaps between them.
NOTE: Cut off the excess yellow dough and set it aside…be sure the save the excess dough, because it will be needed later.


3. Gently roll the dough on the work surface. I like to use a nonstick mat as a work surface.

4. Roll out 1/2 of the remaining yellow dough to a rectangle that is at least 6- x 11-inches. The dough will be thin.
Brush it lightly with egg white, then roll the dough around the cookie log, trimming to fit.

5. Gently roll the log on the work surface to seal and make the surface even and smooth.

6. Trim the edges of the log with a sharp knife, revealing the flower pattern.


7. Wrap the log in plastic, and return it to the freezer.
Repeat the steps with the second log.
8. Chill both logs for 1/2 hour, so they are nice and firm.
Construct the final outside combined aqua/teal cookie doughs around the yellow cookie dough flower log = finished Millefiore Slice and Bake Cookie Dough Log:
1. Meanwhile, gather up the AQUA and TEAL cookie dough scraps and knead the dough together until the color is uniform.
Wrap this dough in plastic and place it in the refrigerator while the logs chill.

2. After the logs have chilled, remove one from the freezer. Cut the aqua/teal dough in half, and roll one section out on a very lightly floured work surface, to a rectangle that is 6- x 11-inches long.
Brush the dough with egg whites and wrap the log, trimming to fit.


3. Press the seam together, then roll to seal and make a uniform surface.


4. Trim the ends of the roll with a sharp knife.


5. Wrap the finished Millefiore Slice and Bake Cookie dough roll in plastic and place it in the freezer for 20 minutes.
6. Repeat the above steps with the second roll.
STEP IV: SLICE AND BAKE THE MILLEFIORE COOKIES
NOTE: The logs must be very cold and firm before you slice them so the shape does not distort.
1. 20 minutes before you are ready to bake the cookies, position the oven shelf to the middle of the oven. Preheat oven to 325 degrees F.
Line four rimmed cookie sheets with parchment paper or a nonstick mat, such as Silpat Brand mats.
2. Remove one Millefiore Cookie dough log from the freezer and slice it into 1/4-inch thick rounds. After every slice you cut, roll the log forward slightly and cut again, this way the log will preserve its round shape.
If one of the sides of the cookie flattens a bit, gently roll it on its edge on the nonstick mat to help form a round cookie shape, again.
Place cookies on the prepared baking sheets, leaving at least two inches between the cookies. Return any unbaked portions of the cookie dough back to the freezer until needed.


3. Bake cookies for 14-15 minutes or until the cookies are set and the edges JUST start to color.

The bottom of the cookies will be slightly browned.

4. Let cookies cook on the baking sheets for 5 minutes, then carefully remove them to a rack, to cool completely.
STORAGE
Cookies keep for 3-4 days in an airtight container, at room temperature.
They may also be frozen for a month or more.
Other Recipes

Cranberry Banana Loaf
9316 views| 8 comments

Neiman Marcus Chocolate Chip Cookies
10345 views| 15 comments

Healthy Oven Double Berry Icebox Pie
7642 views| 6 comments
My Recipe Tools
Explore How-Tos

Persimmons - How to Cut and Poach
Persimmons come in two varieties: Hachiya and Fuyu. Skin color can range from orange to red... Read More

How to Make Superfine Sugar
What is Superfine Sugar? Superfine = Ultra-fine = Extra-fine = Fine Granulated = Instant Dissolving... Read More

Eggs - Prevent Burning for Egg Yolks
QUESTION: Egg yolks seem to “cook” when we mix the sugar and yolks to make pastry... Read More

How to Zest a Lemon or Lime
With just a few movements of the grater, you can add lots of flavor with citrus peel (lemon, lime,... Read More
Newest Recipes View All

Priscilla’s Fudge Sauce
INGREDIENTS 4 tablespoons unsalted butter 4 ounces bittersweet chocolate, chopped 1 cup sugar 1/2... Read More

Candied Spiced Pink Grapefruit Peels
INGREDIENTS 2 large pink or red grapefruits, preferably organic 1 cup granulated sugar, plus... Read More

Vanilla scented biscuit roulade
About Us

Hi, I'm Sarah Phillips Sarah Phillips, CEO and founder of craftybaking.com, has over 25 years of extensive professional real time baking experience. READ MORE

Hi, I'm Kelly Hong Contributing Editor, Food Stylist and photographer, since 2007. I have been working as a professional ceramic artist for over 25 years. READ MORE