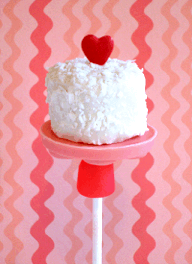
Love Bites Rice Krispies Treats Cake Pops
Recipe by Sarah Phillips and Kelly Hong; Food styling and photos by Kelly Hong © 2012 Sarah Phillips CraftyBaking.com
Variation: Love Bites Rice Krispies Treats Coconut Covered Cake Pops; Rice Krispies Treats Chocolate Tuxedo Cake Pops

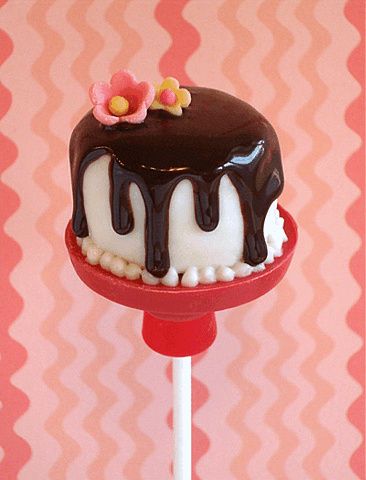
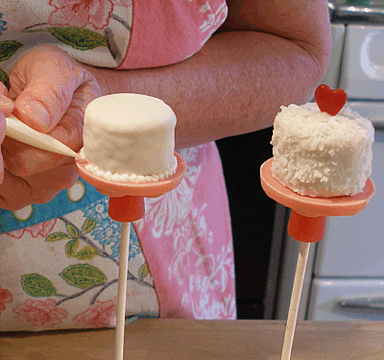
SARAH SAYS: I wanted a Rice Krispies Treat on a stick tutorial. So, when Kelly and I were discussing possible ideas, I sent Kelly a photo of a cake made from Rice Krispies Treats, which had intrigued me! Kelly then came up with a mini-cake version on a stick idea! So cute! I asked her to make the Chocolate Tuxedo version with the chocolate glaze, which I think is my fave!
The possibilities are endless; that's what is so much fun about this! And, you can use your imagination and come up with your own cupcake variation - even using real cake for cake pops - to "wow" your friends and family!
COOKIE RECIPE HELP


INGREDIENTS
STEP I:
2 packages red or pink Wilton Candy Melts
Wilton Flower-themed Oreo Candy Mold
STEP II:
1 "1/2 Recipe Variation Rice Krispies Treats Tweaked", below
1 1/2-inch round cookie cutter
STEP III:
15-16 Wilton 8-inch paper lollipop sticks
2 packages white Wilton Candy Melts
STEP IV:
1 large package Dots (7.5 ounces), gum drop candies. You need a large package to insure that you have enough red and/or pink drops for the project
Round metal skewer
Heart-shaped sprinkles or small heart-shaped hard candies
Block of Styrofoam or a wooden block the length of 2 x 4-inches, with holes drilled in it, to hold the pops upright as you work
INSTRUCTIONS
STEP I: MAKE THE "CAKE PLATE" BASES
INSTRUCTIONS
1. Melt red or pink candy melts in the microwave, according to package instructions, and place 1 tablespoon(I used a 1 tablespoon scoop) of melts in each of the 4 daisy molds in the mold.
This will fill the cavities about 1/2 way up. Do not fill the sections with the rose.
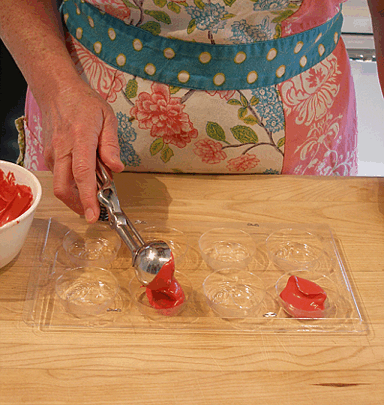
2. Tap the mold gently against the work surface to remove bubbles.
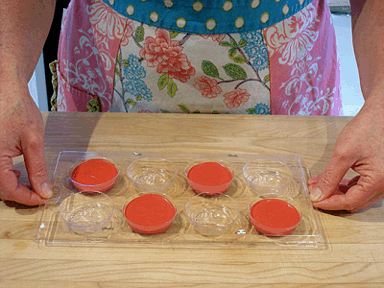
3. Place mold in the refrigerator until the candy coating is hard, then release by gently flexing the mold.
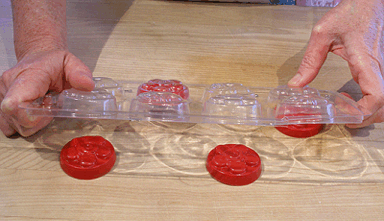
4. Repeat until you have 16 cake plate bases made.
STEP II: MAKE RICE KRISPIES TREATS. CUT-OUT CIRCLES.
Make the Rice Krispies Treats:
"1/2 RECIPE VARIATION RICE KRISPIES TREATS TWEAKED" / recipe alone
Makes one 9 x 5 x 3-inch loaf pan
INGREDIENTS
5 ounces marshmallows, mini or regular size
1 1/2 tablespoons unsalted butter
3 cups Rice Krispies or Gluten-free (Gluten free) Cocoa Pebbles Cereal*
1/2 teaspoon vanilla extract
NOTE: For cereal, you can also use 3 cups Crushed Gluten-free Rice Chex Cereal; crush into small pieces and then measure.
INSTRUCTIONS
1. Spray a 9- x 5- x 3-inch loaf pan with cooking spray. Spray a large wooden mixing spoon with vegetable oil. Set aside.
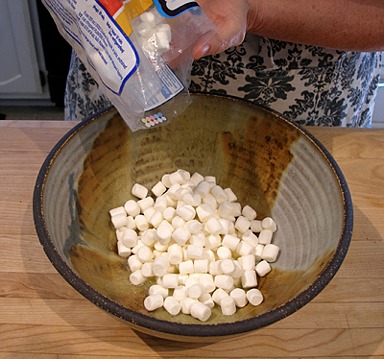
2. Place marshmallows in a large microwave safe bowl. Cut butter into tablespoon size pieces and add.
Microwave the mixture on HIGH for 2 minutes. Stir mixture. Microwave an additional 30 seconds to 1 minute on HIGH, if needed.
Stir until smooth. (Microwave cooking times may vary.)
NOTE: Alternatively, on the stovetop, in a large heavy-bottomed saucepan melt butter over low heat.
Add marshmallows and cook under low heat, stirring continuously until completely melted. Remove from heat.
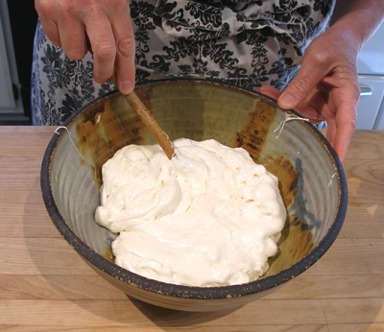
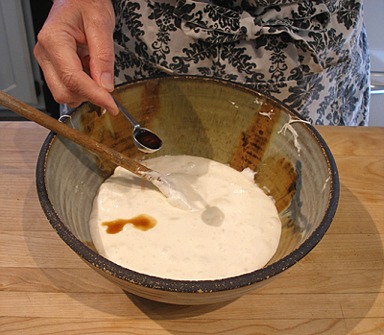
3. Add the vanilla and stir to combine.
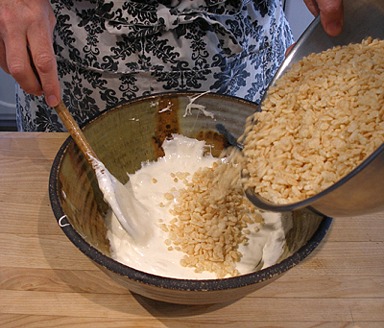
4. Add the Rice Krispies to the bowl and stir until well combined.
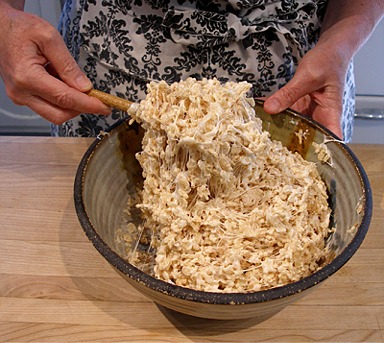
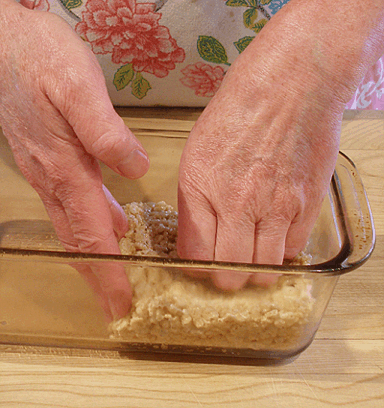
5. Press the mixture evenly into the bottom of a prepared loaf pan.
The layer should measure about 1-inch deep. Make sure to compress the mixture very well, so that the shapes will hold together when cut. Set aside to cool.
Cut-out circles:
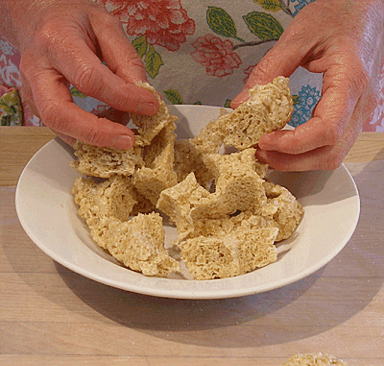
1. When cool, unmold Rice Krispies Treats onto a waxed paper of parchment lined work surface.
2. Cut out circles with a 1 1/2-inch round cookie cutter that you have first sprayed with non-stick spray.
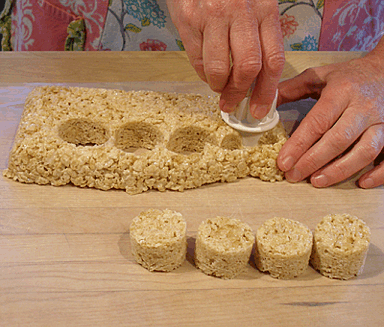
3. When you have cut out all the circles you can, place the scraps in a microwave safe bowl and reheat for 20-30 seconds, or until the mixture is pliable, then press it into about 1/3 of the loaf pan, pressing to compress well.
When cool, cut out as many more circles as you can. I got 15 in total.
STEP III: COAT THE RICE KRISPIES TREATS "CAKES"
INGREDIENTS
15-16 Rice Krispies Treats Circles from STEP II
15-16 Wilton 8-inch paper lollipop sticks
2 packages white Wilton Candy Melts
INSTRUCTIONS
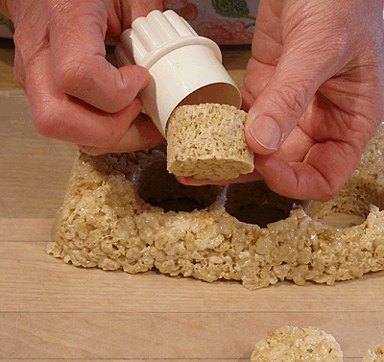
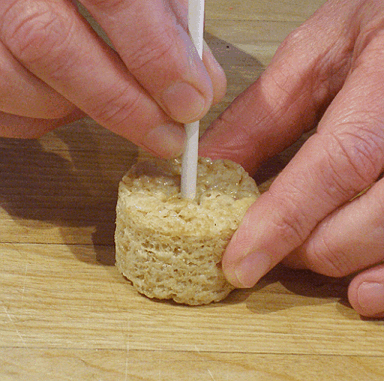
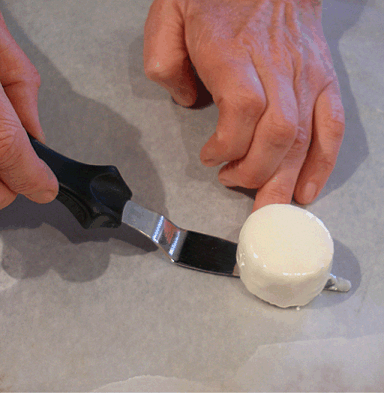
1. Prepare the rounds by pressing a lollipop stick about 1/2 way through the thickness. DO NOT go all the way through!
Remove the stick.
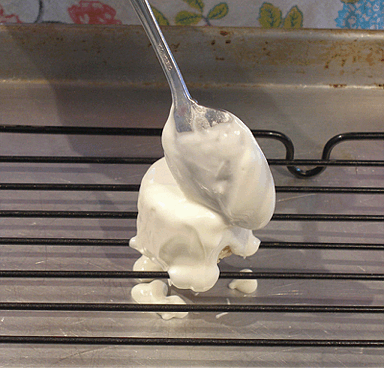
2. Melt about 3/4 cup of white candy melts in the microwave, according to package instructions.
NOTE: I like to melt the coating a little at a time. When the initial quantity is used up, simply melt more, and continue coating.
3. Set a rack over a baking sheet, then place one of the rounds on the rack.
Spoon the melted coating on the round, then tap the rack to remove the excess.
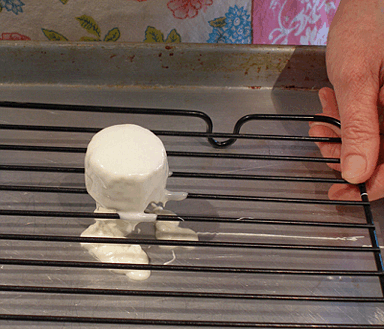
4. Remove the round to a parchment lined baking sheet with a small offset spatula.
5. Continue melting and coating until all your rounds are coated.
6. At this point, you can place the baking sheet in the refrigerator to set the coating quickly.
STEP IV: ASSEMBLE THE LOVE BITES
INGREDIENTS
15-16 White Candy Melt Coated Circles, from STEP III
1 large package Dots(7.5 ounces), gum drop candies. You need a large package to insure that you have enough red and/or pink drops for the project
15-16 Cake Plate Bases, from STEP I
Round metal skewer
Heart-shaped sprinkles or small heart-shaped hard candies
Block of Styrofoam or a wooden block the length of 2 x 4-inches, with holes drilled in it, to hold the pops upright as you work
INSTRUCTIONS
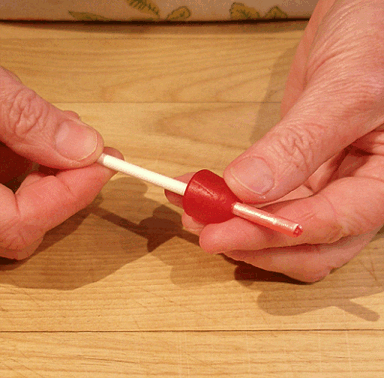
1. Take one red or pink Dot gumdrop, with the wide end down, and push a lollipop stick through its center. Push it down until there is about 1-inch of stick above the top of the gumdrop.
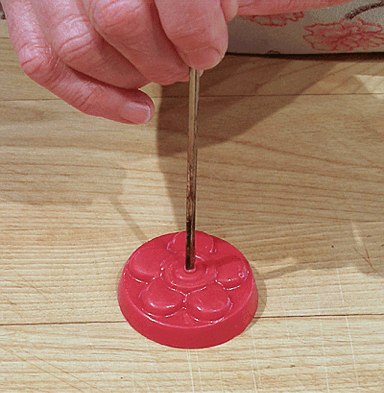
2. Place one of the cake plate bases, daisy side up, on your work surface.
Heat up the end of a metal skewer, then push it through the center of the daisy. Do not force it through. Let the heat do the work.
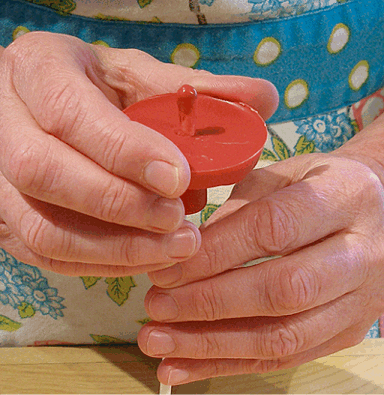
3. Thread the base on the stick, daisy side down, then center it on the gumdrop.
Press down so the residual melted coating will adhere the base to the gumdrop.

4. Place stick in the predrilled block of Styrofoam to hold it while you work.
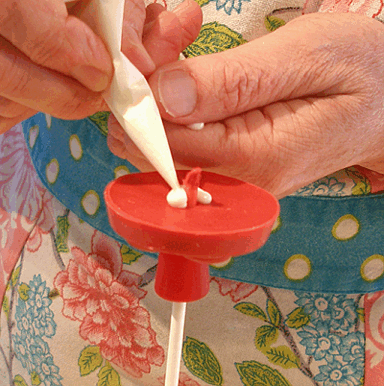
5. Melt a little white coating and pipe a bead in the center of the cake plate base. You can also use a toothpick to apply dots of melted white coating.
NOTE: Place melted candy melts in a small plastic bag. Then, cut the tip off to use as a "piping bag".
6. Place the coated and dried cake round in place, pressing to adhere.
NOTE: See VARIATIONS, below, for Coconut Covered Cakes.

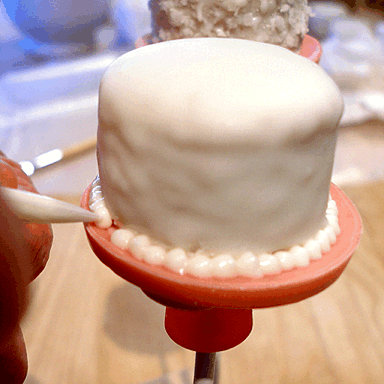
7. Pipe a drop of coating in the center of the cake and place heart sprinkle in place, holding briefly until it can stand on its own.
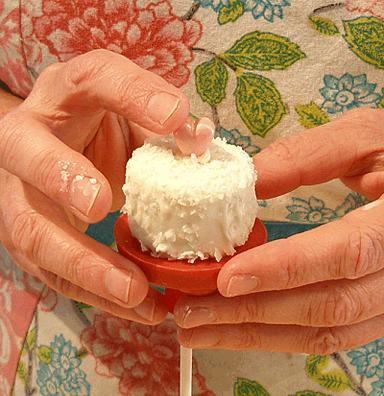
8. The plain rounds do not have the luxury of the shaggy bottom to help them merge seamlessly on the cake plate. To hide the voids at the bottom of the plain rounds, you may pipe little beads of melted coating around the base.
This is not absolutely necessary, but it looks neat, and helps reinforce the itty bitty cake illusion.
STORAGE
Store no more than two days at room temperature in airtight container.
To freeze, place in layers separated by wax paper in airtight container. Freeze for up to 6 weeks. Let stand at room temperature for 15 minutes before serving.

VARIATIONS
Rice Krispies Treats Coconut Covered Cake Pops
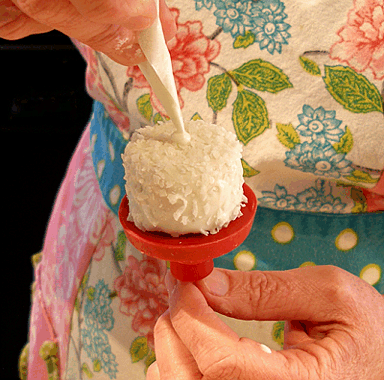
NOTE: Apply to a candy coated cake pop, after STEP III, while the coating is still wet.
INGREDIENTS
Sweetened flaked coconut
INSTRUCTIONS
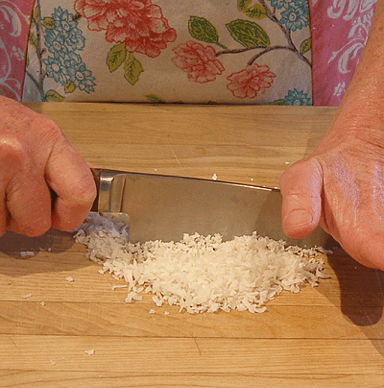
1. Chop some sweetened coconut. You must chop the coconut so it doesn't look out of scale on the tiny cake.
2. Then sprinkle it over the round while the candy coating is still wet.
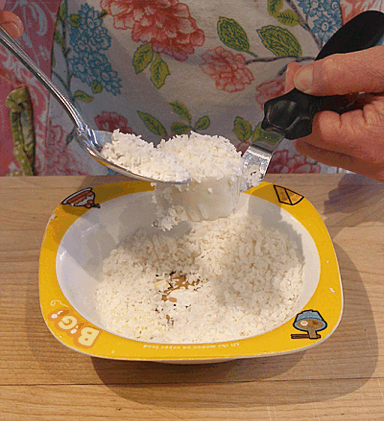
3. After the surface is evenly sprinkled with coconut, place it on a parchment lined baking sheet until the coating has set.
4. Proceed with STEP IV, above.
Rice Krispies Treats Chocolate Tuxedo Cake Pops
NOTE: Apply to a fully assembled cake pop.

INGREDIENTS
Chocolate Cake Glaze, warmed
INSTRUCTIONS
1. Place a small amount of the chocolate glaze, in a squeeze bottle.
2. SLOWLY drizzle a bit on top of the "cake" letting it flow down the sides, tipping down the sides, tipping it slightly, to direct the flow.
NOTE: Be careful to not squeeze on too much, or it will flow off the pop and make a mess of your project. You can "freeze" the movement by placing the pop in the refrigerator to firm it up.

Other Recipes

Fresh Strawberries and Cream Cake
35419 views| 3 comments

Toba Garrett’s Pineapple Curd
12350 views| 37 comments

Homemade Marshmallows
14042 views| 36 comments
My Recipe Tools
Explore How-Tos

How to Grate Ginger
Fresh ginger can be used in baking recipes. Add it in as a flavoring to the recipe. It lends a... Read More

Nuts - Chop
Chopped nuts, such as walnuts, almonds and peanuts, are frequently used in recipes, and are really... Read More

Cookies - How to Decorate
Go to Learn About Cookie Decorating Read More

Baking - How Baking Works
Go to How Baking Works Read More
Newest Recipes View All

Priscilla’s Fudge Sauce
INGREDIENTS 4 tablespoons unsalted butter 4 ounces bittersweet chocolate, chopped 1 cup sugar 1/2... Read More

Candied Spiced Pink Grapefruit Peels
INGREDIENTS 2 large pink or red grapefruits, preferably organic 1 cup granulated sugar, plus... Read More

Vanilla scented biscuit roulade
About Us

Hi, I'm Sarah Phillips Sarah Phillips, CEO and founder of craftybaking.com, has over 25 years of extensive professional real time baking experience. READ MORE

Hi, I'm Kelly Hong Contributing Editor, Food Stylist and photographer, since 2007. I have been working as a professional ceramic artist for over 25 years. READ MORE