
Giving homemade sweets is a nice way to spread Christmas cheer. We use sugar cookie dough for a sweet twist on an old favorite!
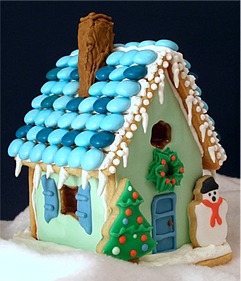
Kelly Says: “I created these cottages to show you how to raise homemade sweets to another level. I have included a cottage template to help guide you so you cannot go wrong.
Who wouldn't want to receive a personal little cottage, filled with love, and made by hand? I know I would.
The reason I chose Sarah's Creative Cut Out Sugar Cookies as the recipe to use for this cookie project, is that each section bakes flat, does not spread and the recipe never fails.
The baked cookies ALWAYS have a wonderful buttery taste! They are my favorite! Sarah's Royal Icing Master Recipe is the best I have ever used!”
COOKIE RECIPE HELP
RECIPES USED:
STEP I: One Sarah's Creative Cut-out Sugar Cookie Dough (makes enough for 2 cottages); Kelly Says: I ADORE Sarah's Creative Cut Out Cookies!
STEP IV: One Sugar Glass Windows Recipe, optional
STEP V: Two Royal Icing Master Recipes; I made two batches of royal icing.
I made one batch the day I iced the cookies, Step #V and then I made another batch the next day, Step #VII, when I put the house together.
SUPPLIES:
Six Gel food coloring of your choice
M&M's color of your choice
Disposable piping bags and couplers
6 – 7 small piping tips- size 2 each
Small leaf piping tip
1 large piping tip-size 8-10
Miniature Christmas cookie cutters- heart, snowman and Christmas tree
Small cutters to cut out windows
PROJECT TIMING:
DAY 1 – Make the cookie dough and bake.
DAY 2 (MORNING) – Decorate the cottage cookie parts.
DAY 2 (AFTERNOON) – Assemble Cookie Cottages.
INSTRUCTIONS – DAY 1
STEP I: MAKE THE CREATIVE CUT-OUT SUGAR COOKIE DOUGH AND PREPARE THE TEMPLATES
Prepare the cookie sheets:
1. Line two non-insulated cookie sheets with parchment or silpat, nonstick baking mats. Do NOT grease the cookie sheets.
Make the cookie dough and cookie templates:
1. Make 1 recipe Sarah's Creative Cut-out Sugar Cookie Dough, wrap and chill it for at least 2 hours.
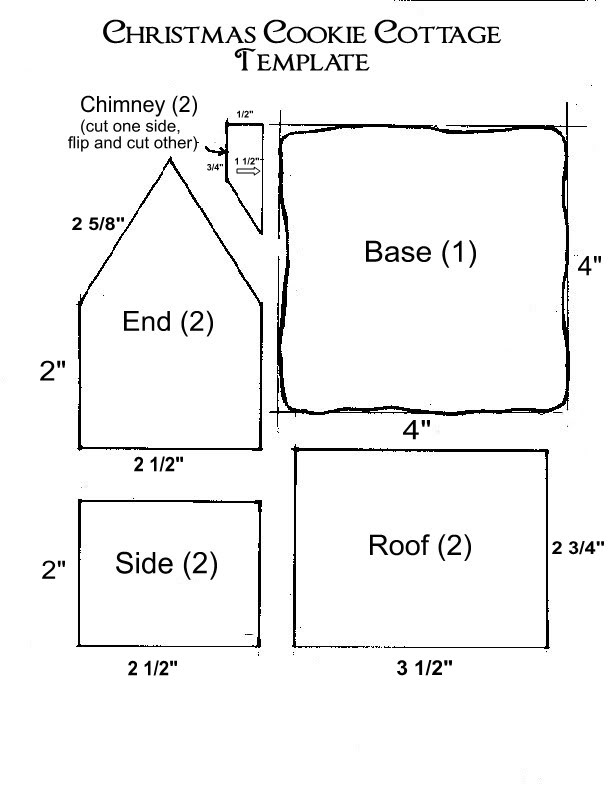
2. While the cookie dough chills, print out template and cut it out.
Print or trace the template out on cardstock, to make it easier to use.
STEP II: MAKE THE FIRST COTTAGE AND BAKE
For one cottage, roll out HALF of the cookie dough and cut-out with a template. Use cookie cutters:
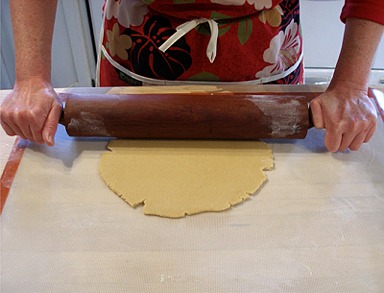
1. When chilled, remove dough from refrigerator, cut in half, and roll it out on a lightly floured surface to a thickness of about 3/16th of an inch.
KELLY SAYS: I like to roll the dough on a nonstick silpat mat; that way I do not have to use excess amounts of flour, which toughen the dough.
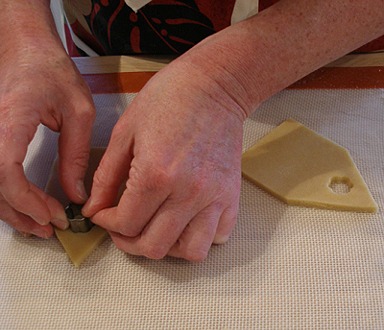
2. With the tip of a sharp paring knife, cut dough out using the template you previously created.

3. Pressing straight down, cut window out of upper part of front and back of house, using a small cookie cutter.
Use different shaped cutter to cut the windows on the sides of the cottage. A square, or other geometric shape is fine
4. Place cut-out cottage dough (except for the chimney) on the prepared cookie sheets, making sure each shape is about an 1-inch apart.
Chill in the refrigerator for 20 minutes.
5. Cut out hearts, snowmen and Christmas trees.
KELLY SAYS: I always make extra, just in case.
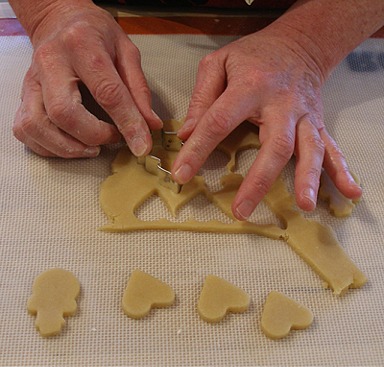
6. Place cut-out house chimney, hearts, snowmen and Christmas tree dough on its own prepared cookie sheet, making sure each shape is about 1/2-inch apart.
Chill in the refrigerator for 20 minutes.
Bake and cool completely:
1. While the cookie dough chills, position two oven racks – one of them 1/3 of the way from the bottom and the top rack 1/3 of the way from the top of the oven.
Preheat the oven to 350 degrees F.
2. Position the cookie sheet with the smaller pieces on the upper rack and the cookie sheet with the larger cottage pieces on the middle rack.
Bake the smaller cookies for 8 to 10 minutes;
Bake the larger cottage pieces, about 10 to 12 minutes until they just start to take on a light brown color around the edges;
do not over bake – the browner the cookies, the harder and more inedible they become.
3. Allow to cool on cookie sheet 1-2 minutes and remove to a wire cake rack to cool.
If baked on parchment paper, cookies can be cooled right on its surface; simply slide the paper with the cookies on top to a wire cake rack to cool. Remove cookies when cooled.
4. Cool completely.
STEP III: MAKE THE SECOND COTTAGE
1. Repeat Step #II, above with the second half of the sugar cookie dough.
Use two cold cookie sheets for the next cottage batch.
STORAGE: At this point, already baked cookies can be stored at room temperature or frozen. Crisp cookies should be stored in an airtight container. They will keep for about 4 days. Wrap cookies well for the freezer where they will keep for about a month.
STEP IV: MAKE THE SUGAR WINDOWS FOR TWO COOKIE COTTAGES, OPTIONAL
1. While baked house cookies cool, make the sugar windows' recipe.
SUGAR GLASS WINDOWS RECIPE by Sarah Phillips
Makes enough windows for two cookie cottages
INGREDIENTS
2 cups sugar, preferably superfine
1/4 cup water
3 tablespoons lemon juice; keeps mixture clear
INSTRUCTIONS
1. Line a baking sheet with foil, and place cookie sections with window cut-outs, right side up, on the foil. Set aside.
2. Place water and sugar plus lemon juice in a pot and cook to soft crack stage (300 degrees F/140 degrees C) on candy thermometer.
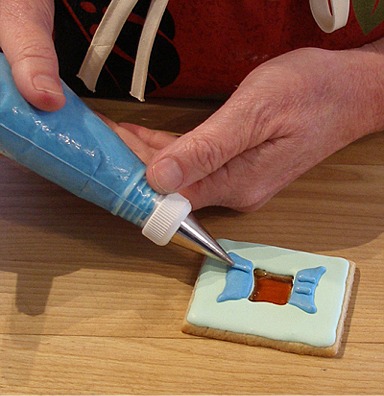
3. Pour cooked glass mixture carefully into the windows. Fill only to the edge, not over.
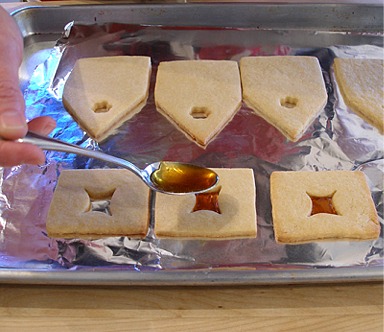
4. Let mixture set in windows for a half-hour, then carefully peel from the aluminum foil.
Set pieces aside on a clean piece of foil in a cool area. The sugar windows can get sticky if the room is warm and/or humid.
STEP V: MAKE ONE ROYAL ICING RECIPE, SEPARATE INTO PORTIONS AND TINT
FOR TWO COOKIE COTTAGES:
1. Make THE FIRST ROYAL ICING RECIPE for thinning and tinting; the second royal icing recipe will be mixed later and used to put the cottages together in STEP #VII
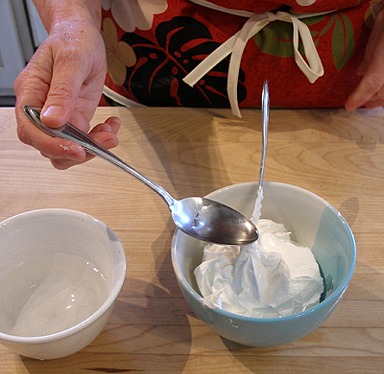
The royal icing should be very thick and fluffy.
2. You will eventually separate out the recipe into nine portions in order to thin some and then, eventually mix into different colors of your choosing.
Set the remainder aside.
KELLY SAYS: I kept the main bowl of the icing covered and just took out a little at a time when I needed it.
For example, the colors I selected were:
FIRST ROYAL ICING RECIPE
Thin and Tint:
3/4 cup royal icing:
Tint Light green – Body of the house and little Christmas tree decorations
1/2 cup royal icing
Tint blue – Doors, shutters and trim and decorations on the Xmas tree
1/4 cup royal icing
Leave white – Snowman and small details
Few tablespoons royal icing each
Tint dark brown – Chimney and Tree trunk
Tint dark green – Body of Xmas tree
Tint black – Snowman's features and hat
Tint red – Snowman's scarf, heart cookie inside the house and decorations on the Xmas tree
Leave white – Body of Snowman
Do NOT thin or tint:
Remainder of royal icing
KELLY SAYS: ALWAYS cover any unused icing tightly, with plastic wrap, when not in use so it does not dry out.
To thin the Light Green and Blue Colors, ONLY:
KELLY SAYS: It is difficult to say how much water to add because it all depends on how much icing you are trying to thin.
I usually just scoop out a quantity, put it in a small bowl, add the water and then tint. I do the same thing to make all the colors I need. For a small bowl of icing, it may be a couple of teaspoons. I never measure it because I add a few drops at a time.
I never thin the whole bowl of icing. I thin it and tint it as I need it.
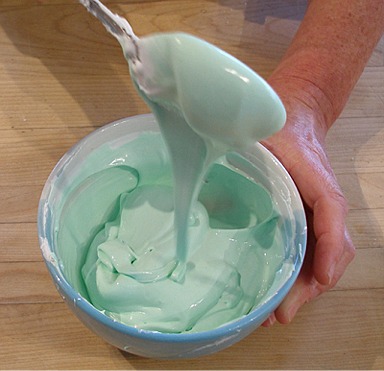
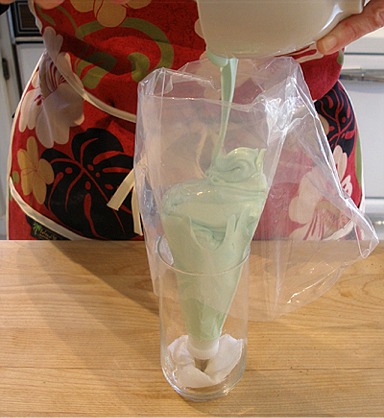
If you look at the photo of the thinning/tinting process below, you can see how the thinned icing flows into the bowl. This is thin enough to flow on the cookie. If you make the icing too thin, it can be really hard to control, and run right off the side of your cookie. You want it to have some body to it.
I know that some people like to make two thicknesses…one to outline and color, and one to fill in. That's a real pain, because then you have to have twice as many piping bags and tips.
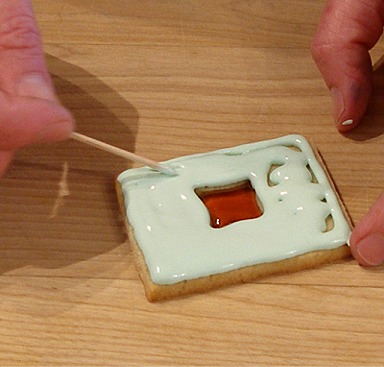
I just outline and fill with the same icing. I move the fill icing around a little, with a toothpick, to get it in all the nooks and crannies. When I am done, I tap it on the counter, gently, to level the icing.
1. For example, for the body of the house, the light green color, I slowly add water and stir it in, till the desired consistency is reached. It should be as thick as honey.
It pipes better if it is not so thick.

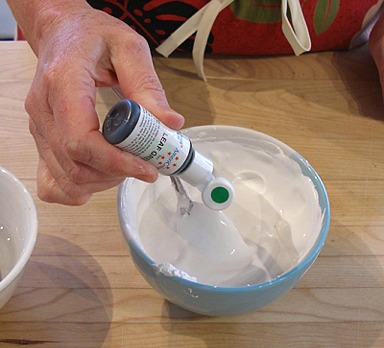
2. Add desired color and stir till uniform.
3. Place a damp piece of paper towel into the bottom of a drinking glass for each piping bag used.
This will help keep the icing from drying in the tip of each piping bag and help prevent eventual clogging.
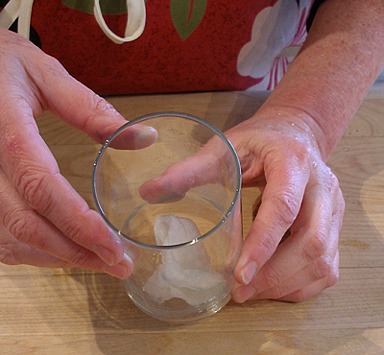
4. Fit a disposable piping bag with a small #2 tip and place one bag each into a prepared glass.
Fill piping bag with royal icing.
5. You will need to thin and mix another color (blue) for the door, shutters and trim. Repeat Step #s 1 – 4, above.
STEP VI: DECORATE THE HOUSE SECTIONS
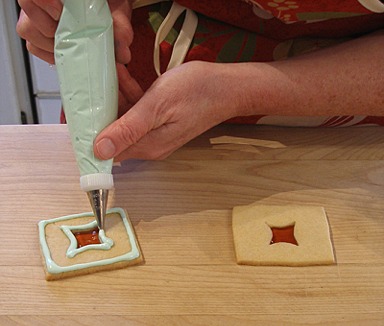
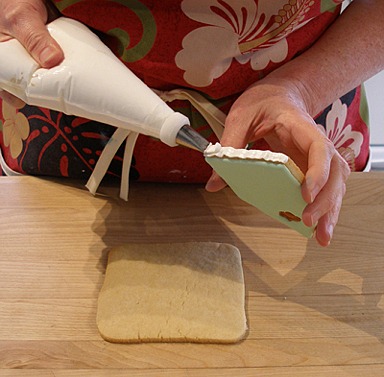
A. Ice the sides of the house with the green color:
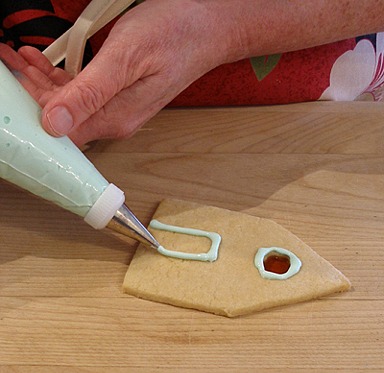
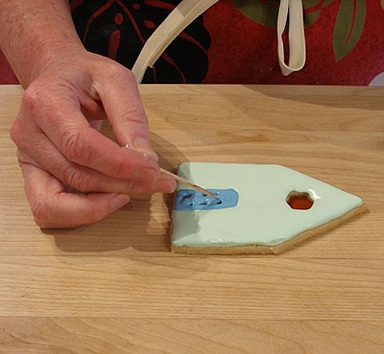
1. Ice the sides of the house by outlining the perimeter of the cookie as well as around the window.
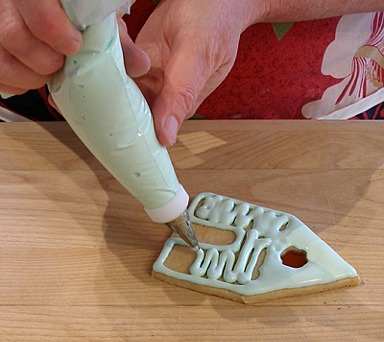
Fill in with icing, coax icing into corners with a toothpick.
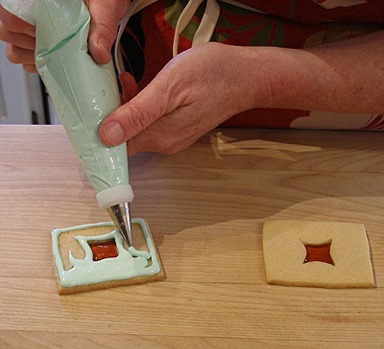
2. Similarly, ice the front of the house, leaving a blank area for the door.
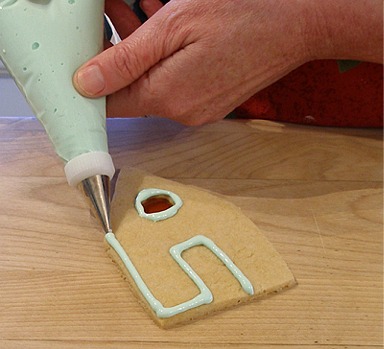
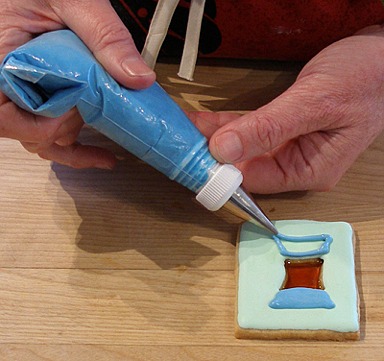
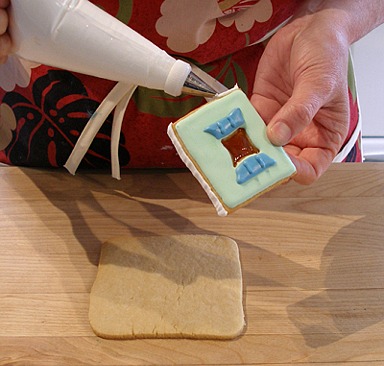
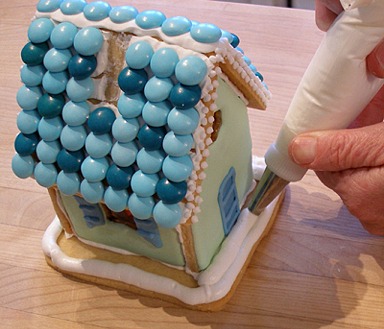
Pipe the doors and shutters on the house with a contrasting blue color:
1. Let the front of the house dry for a few minutes, and then pipe the door with a contrasting blue color.
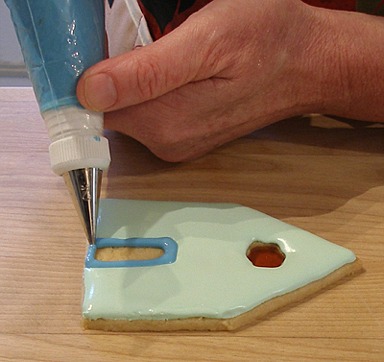
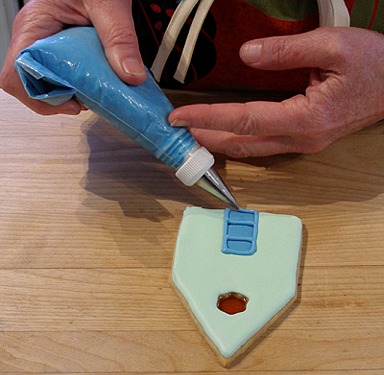
2. Let the sides of the house dry for at least an hour, and then pipe on the shutters.
Set the sides aside to dry.
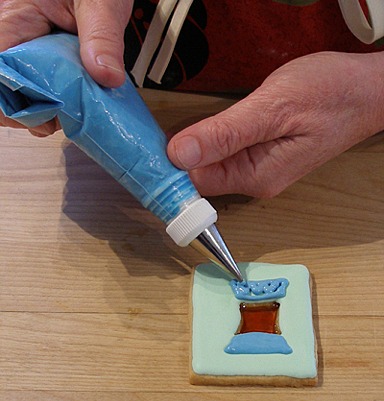
3. Let the door and shutters dry for at least 1/2 hour, then go back in to pipe the blue details on the shutters.
B. Tint the remaining royal icing brown, green, black and red and decorate:
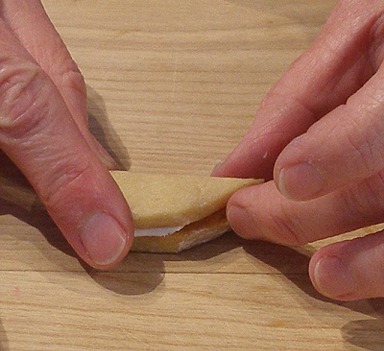
1. Assemble the chimney: take the two sections of chimney and glue them together, back-to-back, with a little white, left-over royal icing (or any color).

2. Mix a few tablespoons of royal icing with a drop of water at a time and stir, to thin it, so it flows like honey.
Then tint it brown.
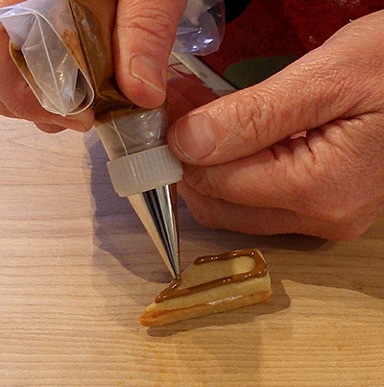
KELLY SAYS: I chose to make mine brown, and have the chimney look like it was surfaced with stucco.
You will have to ice one side at a time, then let that side dry before you do the next.
It is helpful to place the partially iced chimney in a warm place, to hasten the drying. I put mine in a cold oven. I have a pilot light in my ancient oven, so it is always slightly warm inside.
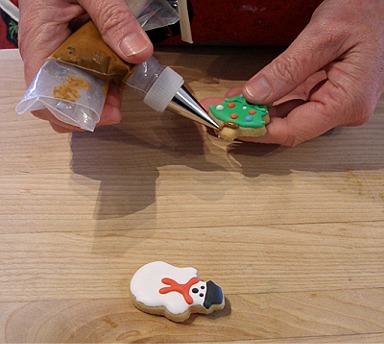
3. Thin and tint your colors for your Christmas tree and snowman: green, black and red. You need only mix very small quantities of icing for this step.[/i]
Ice them, and then place them in a warm place to dry. When they are dry, flip them over and ice the other side.
Remember – Let the bottom color dry first before you pipe another color on top of it.
STORAGE
Place the iced cookies in an airtight container; do NOT stack. Leave them on the counter overnight. Do not freeze decorated. The cookies can be stored UNDECORATED.
ALWAYS cover any unused icing tightly, with plastic wrap, when not in use so it does not dry out. Store at room temperature.
INSTRUCTIONS – DAY TWO (MORNING):
STEP VII: MAKE SECOND ROYAL ICING RECIPE. MAKE THE WREATHS. DECORATE THE ROOF SECTIONS.
1. Make the Second Royal Icing Recipe. It should be light and fluffy. Keep it tightly covered with plastic wrap so it does not dry out.
Make the royal icing run-our wreaths:
You will need 4 wreaths total for two cottages, but make extra, because they are fragile, in case any break.
1. Remove 1/2 cup of the white royal icing and tint it green.
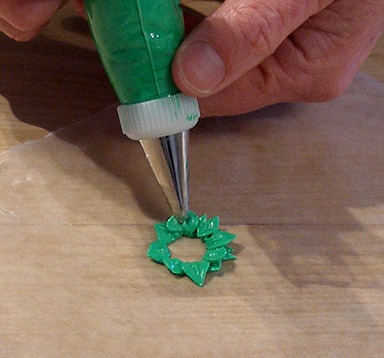
Fit your piping bag with a small leaf tip and fill.
2. Place a damp piece of paper towel into the bottom of a drinking glass for each piping bag used.
This will help keep the icing from drying in the tip of each piping bag and help prevent eventual clogging.
Place your filled piping bag in the glass, tip side-down when not in use.
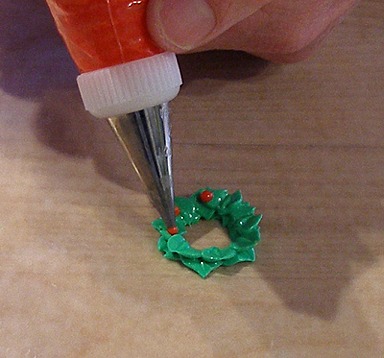
2. Tint a small white royal icing red, and fit your piping bag with a small plain tip and fill.
Place a damp piece of paper towel into the bottom of a drinking glass for each piping bag used.
This will help keep the icing from drying in the tip of each piping bag and help prevent eventual clogging.
Place your filled piping bag in the glass, tip side-down when not in use.
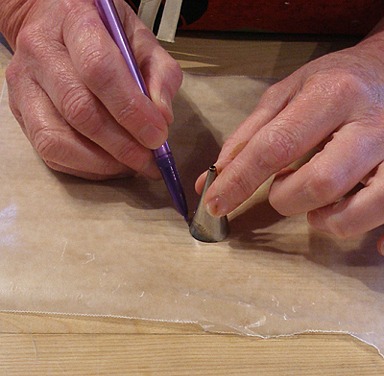
3. Place a piece of waxed paper or parchment on your work surface.
Take a piping tip and draw around the large end with a pencil, making a circle.
Use this circle as a guide when your pipe your wreathes.
4. Pipe two layers of leaves, one on top of each other. Pipe the second layer of leaves in between the spaces of the leaves formed on the first layer.

Then, pipe red dots on the leaves for the berries.
5. Place wreathes in a warm place to dry. I placed them in my oven, with the pilot light on.
NOTE: Wreathes must be completely dry before you attempt to remove them from the waxed paper.
Decorate the roof sections:
1. Fit a piping bag with one large piping tip, size 8 – 10.
Fill with UNTHINNED and untinted royal icing for this step.
2. Place a damp piece of paper towel into the bottom of a drinking glass for each piping bag used.
This will help keep the icing from drying in the tip of each piping bag and help prevent eventual clogging.
Roof Section:
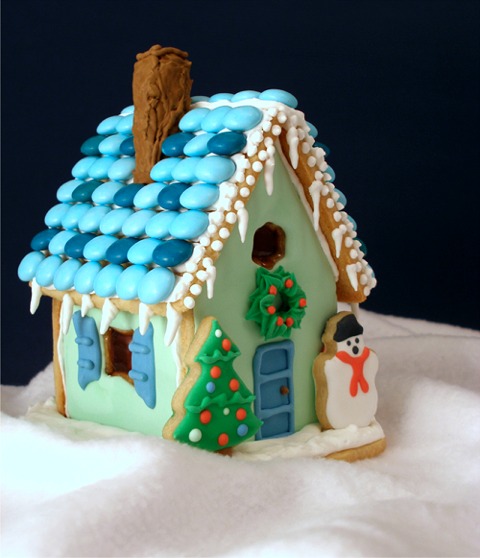
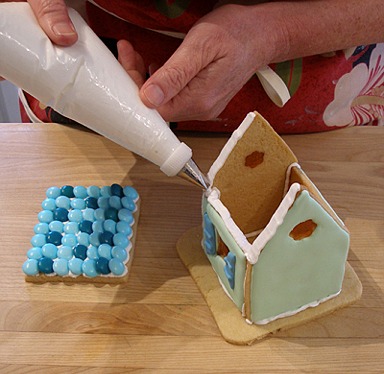
1. Start with the roof section of one cottage to cover with the M&M's.
2. Pipe a ribbon of royal icing along the bottom of one of the roof sections.
3. Add the M&M's in a neat row.
Take care not to get them wet because the colors tend to bleed.
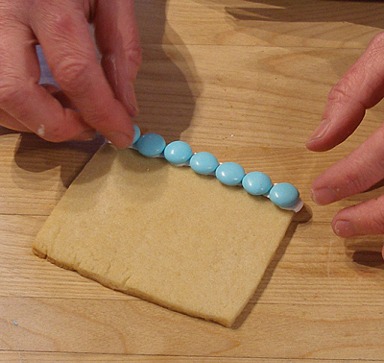
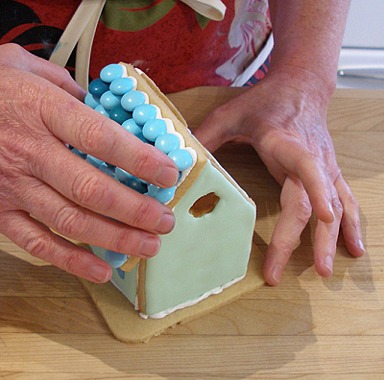
4. Continue adding rows of M&M's, slightly overlapping, like roof tiles.

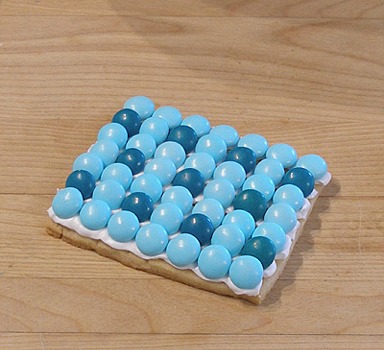
5. On one side of the roof, you will have to leave space for the chimney.
Leave a space that is one M&M wide, and three M&Ms deep.

6. Repeat Step #s 1-5 with the second cottage roof.
7. Set both roofs aside to dry. They need about 1 1/2 hours each.
STORAGE
Store the unused royal icing, tightly covered with plastic wrap so it does not dry out, in a cool place on your kitchen countertop.
INSTRUCTIONS – DAY TWO (AFTERNOON):
STEP VIII: ASSEMBLE THE COTTAGES
NOTE: The royal icing must be COMPLETELY dry before you attempt to assemble the cottages.
A. Assemble the cottages, WITHOUT their roofs, while the roof M&M “tiles” set to dry. Let the assembled houses dry.
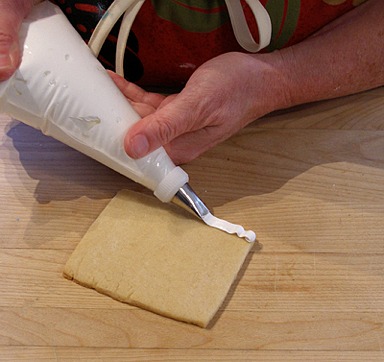
1. Take the base cookie and place it on your work surface.
Using the piping bag fitted with one large piping tip, size 8 – 10, pipe THICK royal icing along the bottom of the back of your cottage.
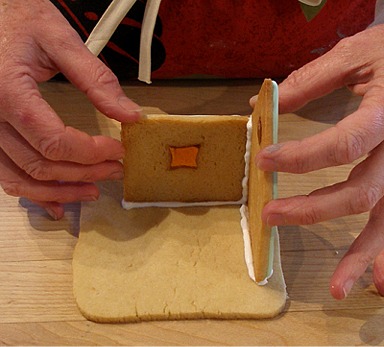
2. Pipe icing along the bottom and one side of one of the cottage side walls.
3. Glue the back of the house about 1/2-inch in from the back of the base cookie.
You want there to be more room in the front of the house, so you will have space for the Christmas tree and snowman.
Then glue the side of the house to the back of the house. Hold the cookies for a moment, until they feel secure.
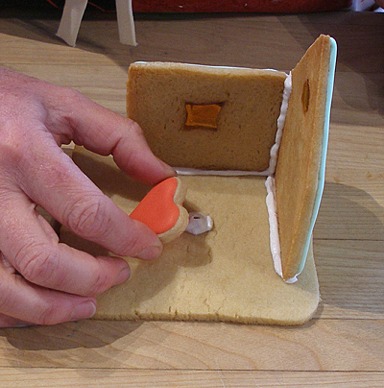
4. Place a little dab of icing in the center of the base and place the heart inside the house.
I added the cookie heart as a little surprise for the recipient. It represents the love one feels for friends and family.
5. Pipe icing on the side and bottom of the other side of the house and glue into place.
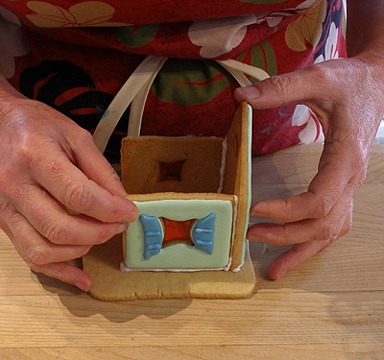
6. Pipe icing on other end of side walls and on the bottom of the front of the house, and then set it in place.
7. Repeat Step #s 1 – 6 with the second cottage.
8. Let both cottages dry for at least an 1 1/2 hours before attempting to attach the roof sections.
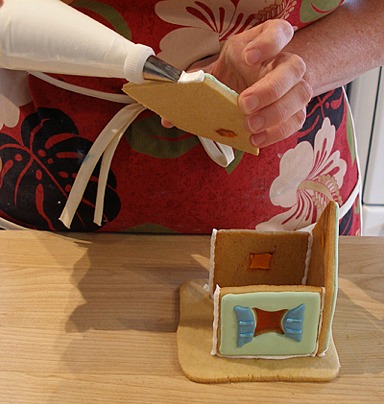
B. Attach the cottage roofs to the assembled houses.
1. Pipe icing and then place the roof in place for one cottage.
Align the bottom of the cookie's roof with the peak of the house.
Find something that is the right height, and support the roof sections in place till the icing sets up.
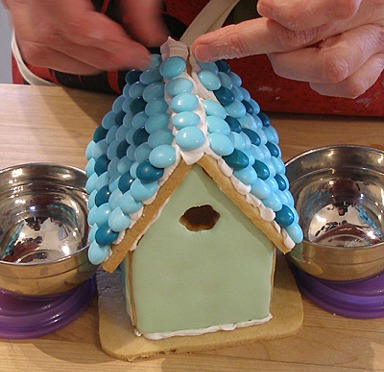
2. For the second roof section, pipe icing along the top edge of the first roof section.
Place the roof in place.
The second roof section will slightly overlap the first one at the top.
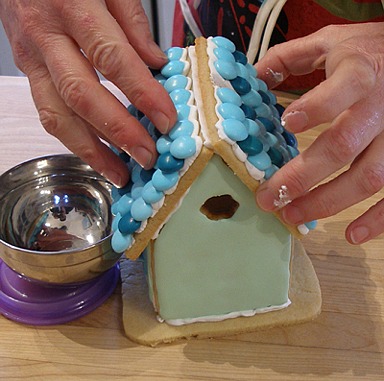
3. Pipe a ribbon of icing along the ridgeline of the roof and place a row of M&M's on the icing.

4. Repeat Step #s 1 – 3 with the second cottage.
5. Let both roofs dry for about a 1/2 hour before removing the supports.
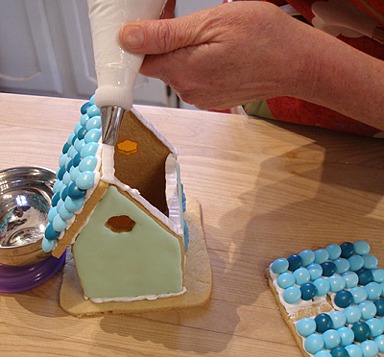
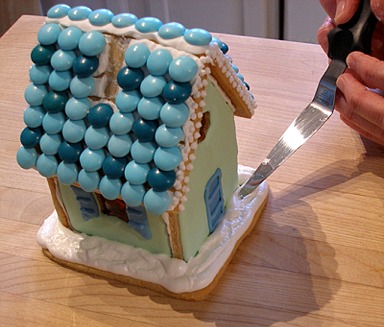
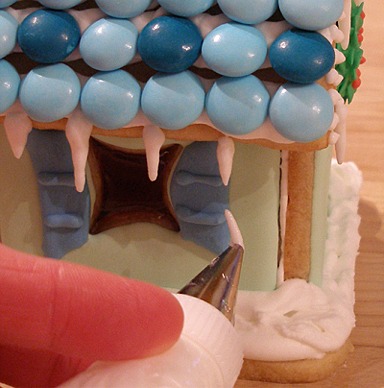
C. Finish decorating the base of the Cookie Cottages
1. Pipe a thick layer of icing along the base of one cottage to cover the cookie.
2. Use a small off-set spatula to swirl the icing and make it look like snow-drifts.
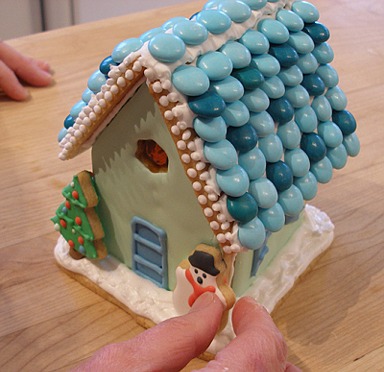
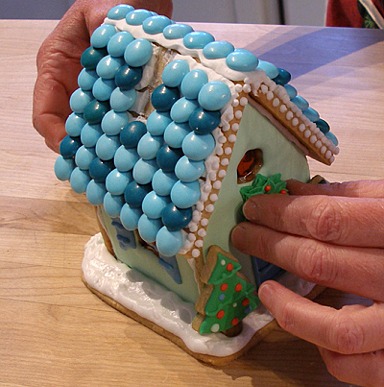
3. Take the decorated snowman and Christmas tree and set them into place.
Oops! I forgot the doorknob!
4. Put a small dab of royal icing on the back of one of the wreathes and glue it to the back of the cottage.
Take care because the wreath is very fragile.
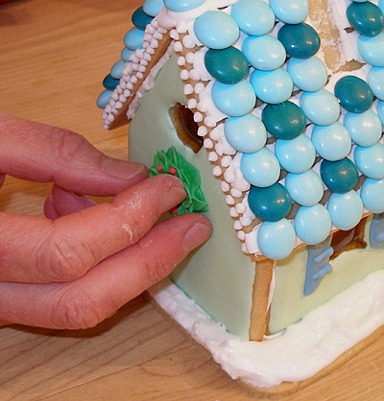
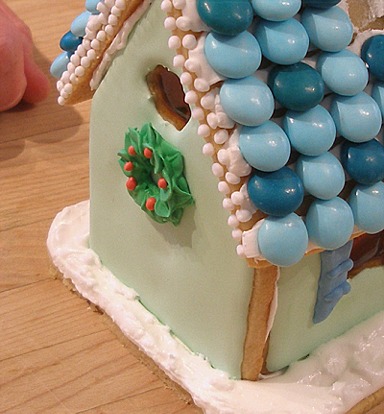
5. Carefully place another wreath on the front of the house, after putting a small dab of royal icing on the back of it.
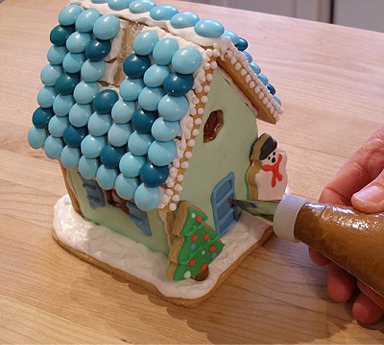
6. Pipe some royal icing on the bottom of the chimney and set it in place.
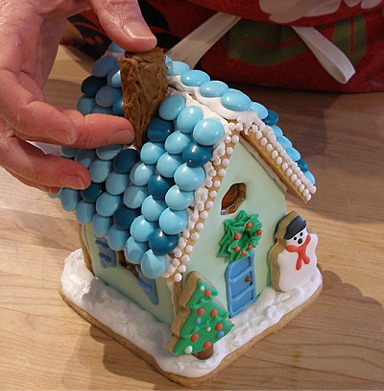
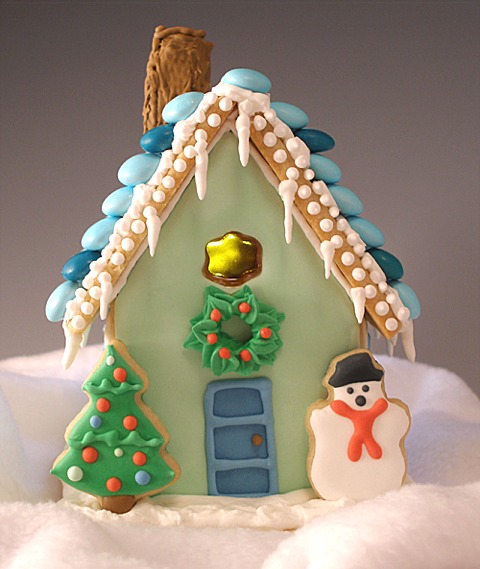
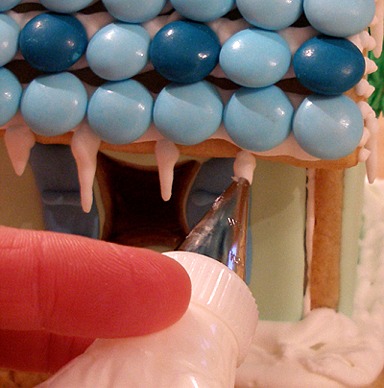
EXTRA DECORATING FUN: As you can see by the photos, I also added little dots of white icing along the edges of the roof.
When I looked at the cottages, I decided that something was missing, so I added icicles, too.
Using the royal icing, with a #2 tip, gently squeeze bag and then pull away. The thread of icing will break, randomly, creating icicles.
7. Repeat Step #s 1 – 6 with the second cottage.
8. Let both cottages dry for at least 2 hours.
STORAGE
For short – or long-term storage, wrap cookie cottage in plastic wrap and place in an airtight container. Store in a cool, dry place. It should last for a long time.
SARAH SAYS: I have left the baked and decorated Creative Cut-Out Cookies, used in this recipe, out on the countertop UNWRAPPED for a week, as a test, and they were still buttery and edible!