
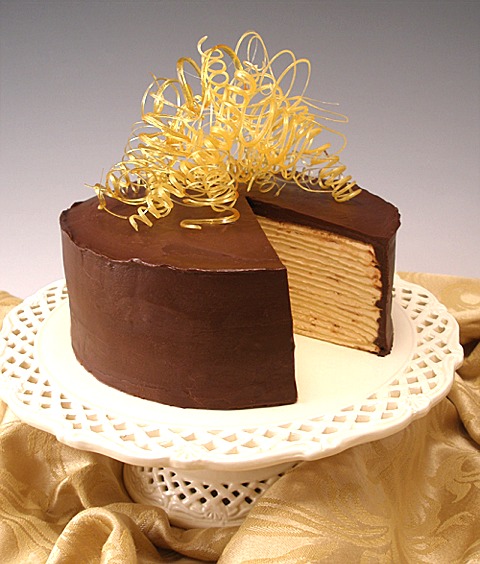
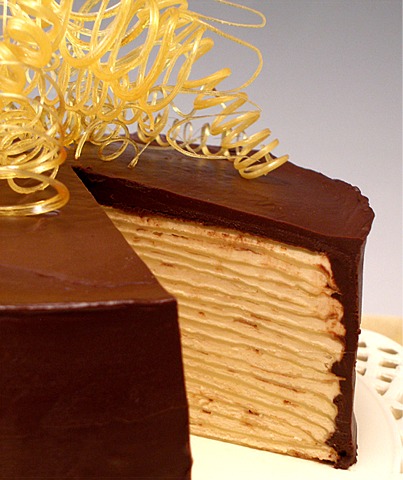
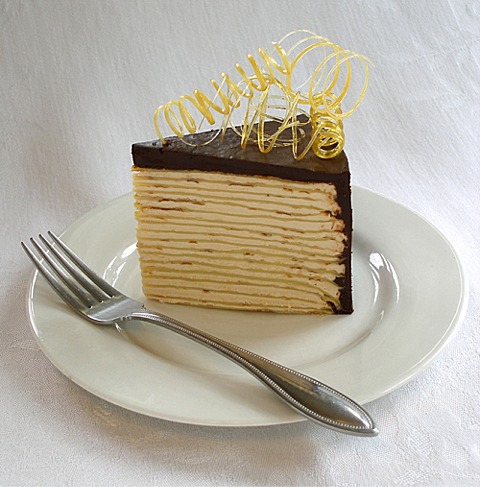
We have always wanted to do a tutorial for this ethereal dessert! Light and luscious, it is a classic, however with Kelly's artistic interpretation. It is composed of twenty layers of thin French crepes and is SO delish.
QUICK-BREAD RECIPE HELP / CAKE RECIPE HELP
INGREDIENTS
To make this cake, you will need the following:
Make in advance; right before making crepes or 1 or 2 days before.
 1 recipe Caramel Swiss Meringue Buttercream Tutorial
Can be made in advance and frozen:
 2 recipes Crêpes Tutorial, make 20 crepes total. It is OK to double the recipe.
Make the day of:
1 recipe Chocolate Ganache (recipe follows)
Make the day of:
1 recipe Caramel for Caramel Spirals (recipe follows)
INSTRUCTIONS
STEP I: MAKE THE CREPES
1. Make the crepe batter (2 times the recipe) and set it aside for 20 minutes, to rest.
2. Cook the crepes and do not stck them, but rather place on a wire cake rack or single layer paper towels to cool for about 20 minutes; do not place on waxed paper or foil because they will condense
and become soggy.
STEP II: ASSEMBLE THE CAKE
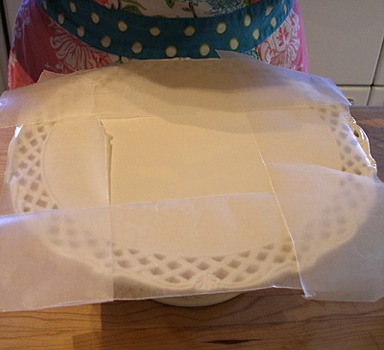
1. Choose a 9-inch or larger diameter cake stand or cake plate.
NOTE: If you have a cake decorating turn table, place the cake stand/plate on the turn table. This will make the process much easier.
2. Place 4 strips of waxed paper around the edges of the plate, to keep it clean while you glaze the cake.
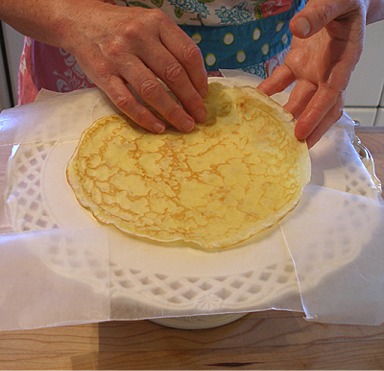
3. Starting with one cooled crêpe, place it in the center of the cake plate.
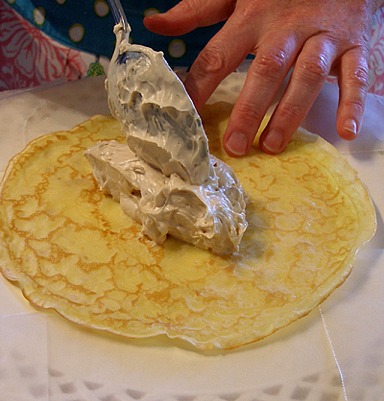
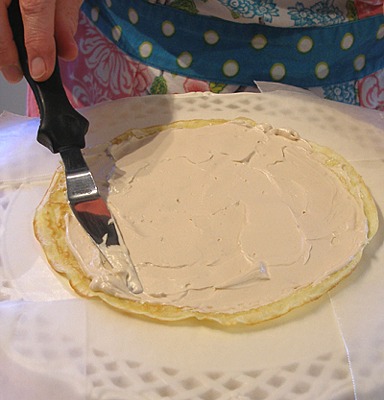
4. Take about 1/4 cup of buttercream and spread it out to the edge if the crêpe, using a small offset spatula.
Smooth the frosting as close to the edge as possible, leaving a 1/4- to 1/8- inch border of unfrosted crêpe.
5. Place another crêpe on top of the frosted one, matching up the edges, to keep the stack as neat as possible.
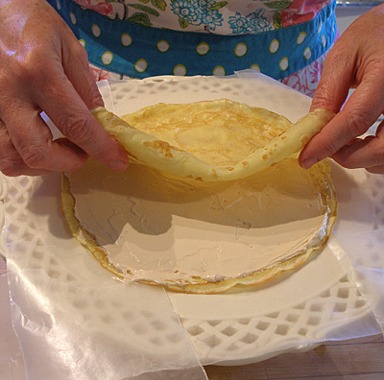
6. Spread the second crêpe with buttercream, following Step # 4.
7. Continue in this manner, following Step #s 4 and 5, until all the crêpes are used, ending the top of stack with a plain crêpe.
8. Cover with plastic wrap and place the crêpe cake in the refrigerator so the buttercream firms up, about 20 minutes.
9. While the cake is in the refrigerator, make the chocolate ganache glaze.
STEP III: MAKE THE CHOCOLATE GANACHE
When the ganache is only SLIGHTLY warm to the touch, remove cake from refrigerator and glaze it.
CHOCOLATE GANACHE
INGREDIENTS
10 ounces semi-sweet or bittersweet chocolate
1 1/4 cup heavy cream
1 tablespoon light corn syrup
INSTRUCTIONS
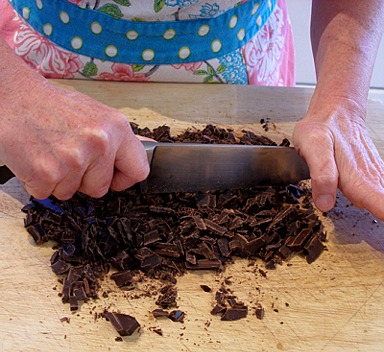
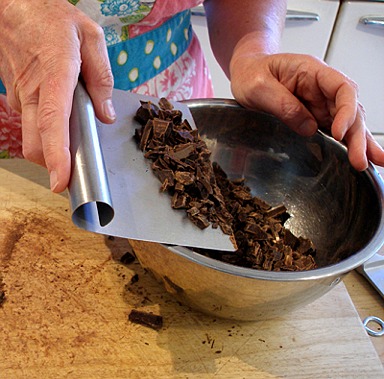
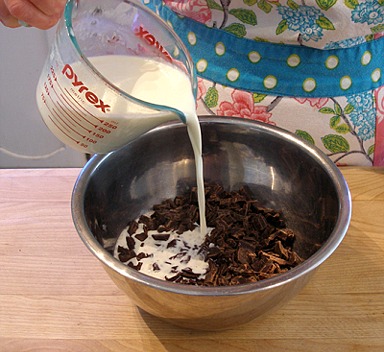
1. Chop the chocolate into 1/4-inch evenly sized pieces and place it in a medium size heat-proof bowl.
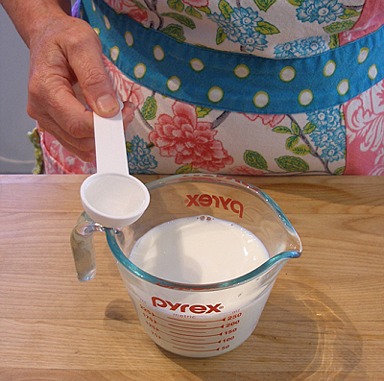
2. Heat cream until it begins to boil.
KELLY SAYS: I carefully heated mine in the microwave on 50% power in several passes, stirring often.
Place the corn syrup in the hot cream and stir to combine.
3. Then, pour the cream mixture over the chocolate.
Gently shake bowl to make sure all the chocolate is submerged in the hot cream.
4. Wait for a minute or two then stir the chocolate till all the chocolate is melted and ganache is smooth.
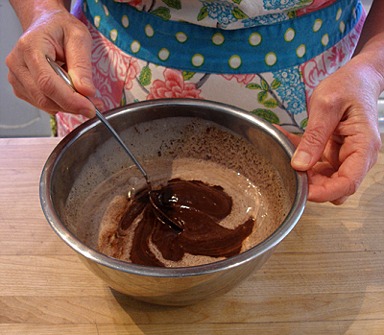
5. Set the ganache aside to cool to just slightly warm to the touch, stirring occasionally.
It should be the consistency of pudding.
6. When the ganache is only SLIGHTLY warm to the touch, remove the cake from refrigerator.
You must work quickly to glaze the cold cake.
STEP IV: GLAZE THE CAKE
chefcandy, Preium Member, says: I used this (technique) on my…crepe cake…it came out PERFECT!!! I loved the freezer time it took also, It gave me 20 minutes to clean up and refocus and start on another cake…
LOVE THIS!!!
1. IMMEDIATELY place about a cup of the SLIGHTLY warm ganache on the center of the cake.
QUICKLY spread it over the top and down the sides of the cold cake, with a large off-set spatula; the glaze will not drip on it own because
it tends to be thicker than a glaze.
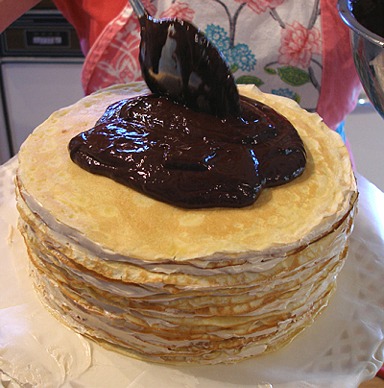
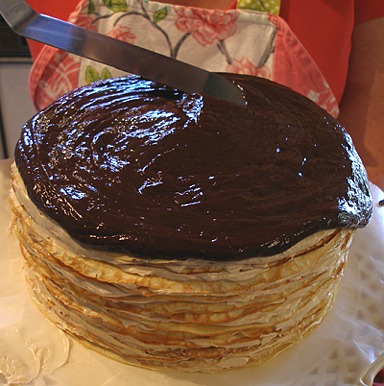
2. Add more ganache on the edges of the cake, till the sides are evenly covered.
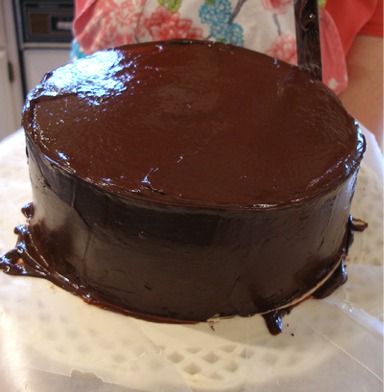
3. Remove any excess ganache from the waxed paper, and place it back into the bowl.
4. Place glazed cake into the refrigerator, so the ganache can set-up.
STORAGE
You may keep the cake refrigerated for 1 to 2 days.
STEP V: MAKE CARAMEL SPIRALS
Prepare the cake:
1. An hour before you want to serve the cake, remove it from the refrigerator.
This cake tastes best when it is not cold, but you cannot store it at room temperature, because the filling is perishable.
2. Run a sharp knife around the base of the cake to release it from any excess chocolate that is on the waxed paper.
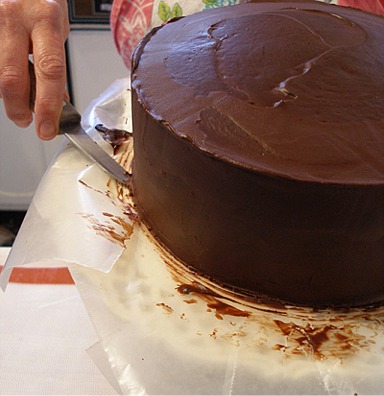
3. Lift edge of cake with a spatula and remove the waxed paper.
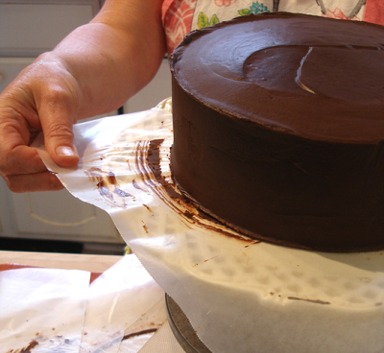
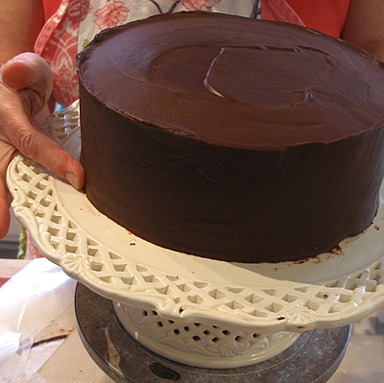
4. Run your finger around the bottom of the cake, to smooth it.
Remove any stray chocolate from your serving plate with a paper towel.
Set the cake aside to warm to room temperature; make sure the room is not too warm.
5. Immediately, make the caramel spirals for the top of the cake.
Prepare the Caramel Spirals:
CARAMEL SPIRALS / Recipe alone
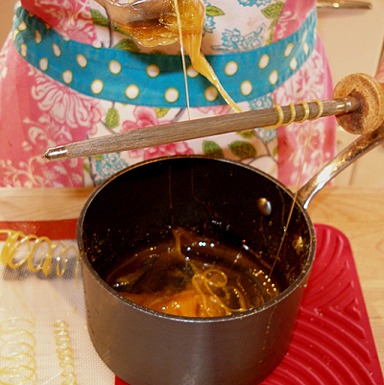
Before you start making the caramel, look through your kitchen for tools on which to create the caramel spirals.
You may use the stainless steel handle of a whisk and/or a knife sharpening steel.
The handle needs to be uniformly thick, and cannot flare out at the end, or you won't be able to remove the curls without breaking them.
It looks better if there are at least two different sizes of spirals on your cake. I used a large round whisk handle, a sharpening steel, and a small metal whisk handle.
INGREDIENTS
1 cup sugar; SARAH SAYS: I like to start with a fresh bag of sugar! Use a brand name CANE sugar for best results.
1/3 cup water
1 tablespoon corn syrup
INSTRUCTIONS
1. Have a large boil of ice and water ready. Set aside.
Cover a rimmed cookie sheet with a silpat nonstick mat. Set aside.
Boil water in a pot the caramel pot can fit on top of so you can rewarm the caramel when it cools too much. Cover and set aside.
Put a small amount of oil on a paper towel, and wipe the surface of the whisk handle and/or sharpening steel you will be using to form
the spirals on. Set aside.
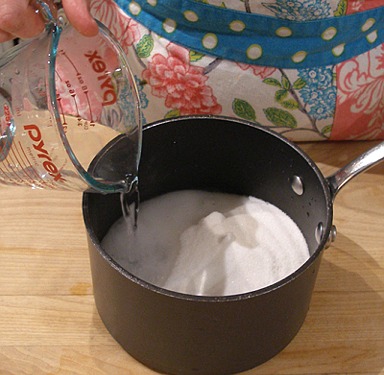
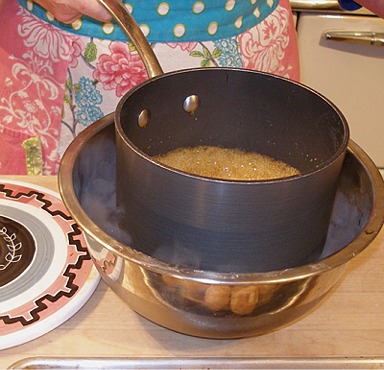
2. Place the sugar and water into a 2-quart heavy bottomed saucepan.
SARAH SAYS: The pan must be spotlessly clean and dry, otherwise the sugar can crystallize.
Place over a medium heat.
3. Stir constantly till the sugar is totally dissolved and the liquid is ready to come to boil.
Stir in the corn syrup.
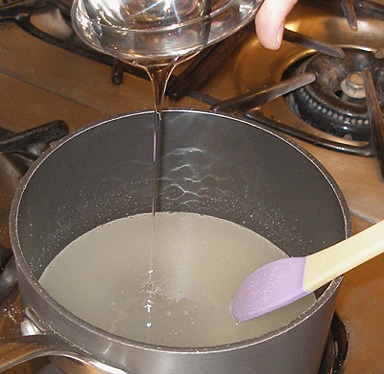
4. STOP stirring, and raise the heat to high.
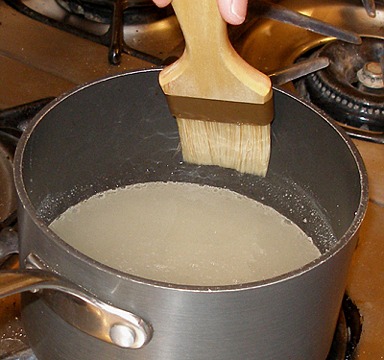
Wash down the sides of the pot with tap water and a clean brush. Dip the brush in water every time you use it.
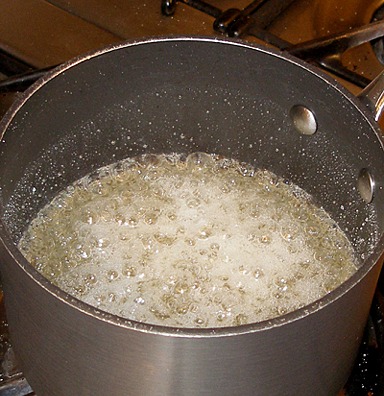
5. Continue to let the sugar solution boil. DO NOT STIR or disturb the pot in any way, otherwise the sugar solution can crystallize.
Boil until the sugar solution takes on an amber color. This takes about 10-15 minutes.
6. When it reaches the right color, remove pot from the heat and plunge the bottom of the pot into ice water – hold for about 5 seconds.
This stops the cooking process!
7. IMMEDIATELY remove the pot from the ice bath and set on a heatproof surface.
Stir caramel with a heatproof-handled spoon. Do NOT use a wooden spoon.
The caramel will begin to thicken as it cools.
Now be patient, you must allow the sugar to cool slightly and begin to thicken, before you can begin making the spirals.
This takes about 5-10 minutes. Slowly stir caramel, to assure the sugar cools evenly.
8. When caramel begins to get thick, pull up your spoon and observe the way the caramel falls from it.
When it begins to fall in a thick slow ribbon, it is ready to use.
Have a bowl of ice and water nearby in case you burn yourself with hot caramel; plunge any burned area into the cold water to stop the burning.
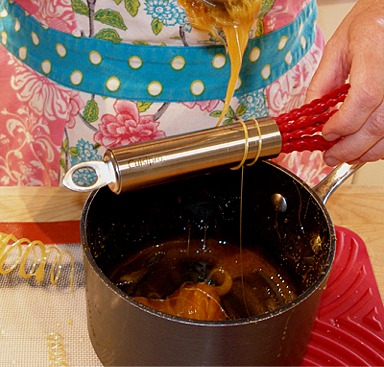
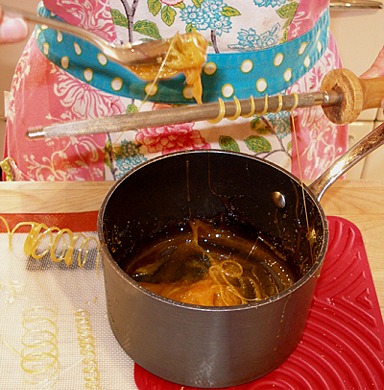
9. Lift spoon from the caramel and let it begin to flow off the spoon, into the pan.
Starting at the whisk end, begin wrapping the caramel, in a spiral, down to the end of the handle.
Be careful because the caramel is VERY HOT.
NOTE: If the caramel just falls off the handle, it is still too hot. If this happens, just let it cool a little longer.
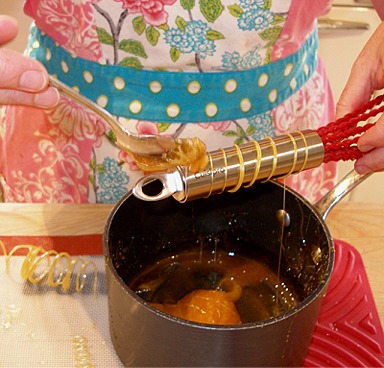
10. Wait about ten seconds, and gently remove the spiral to a silpat lined baking sheet.
Leave space between the spirals so they don't stick together.
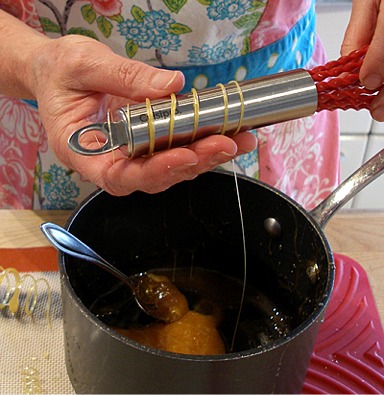
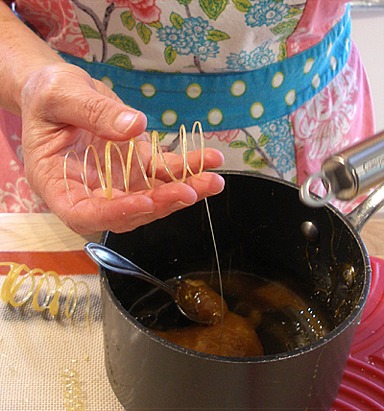
11. For the sharpening steel, use the same technique; it has a smaller circumference and will make the spiral tighter.
Continue making spirals, reheating the caramel when it gets too thick to work with.
SARAH SAYS: If the sugar begins to thicken too much, rewarm it on the top of a double boiler placed over previously boiled water.
There is a very narrow temperature window when the caramel is workable. The more you do it, the better you will get at it. It just takes practice.


KELLY SAYS: You could tell I was having lots of fun making caramel spirals!
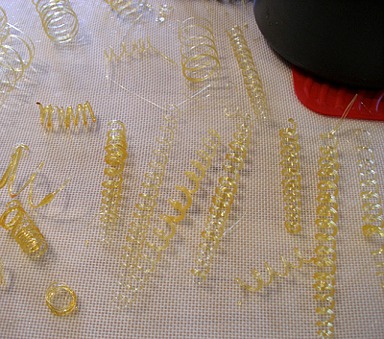
STORAGE
The caramel spirals can be kept in a cool, dark place until needed, for about an hour.
Do not refrigerate or subject to humidity, otherwise they will become sticky and may collapse.
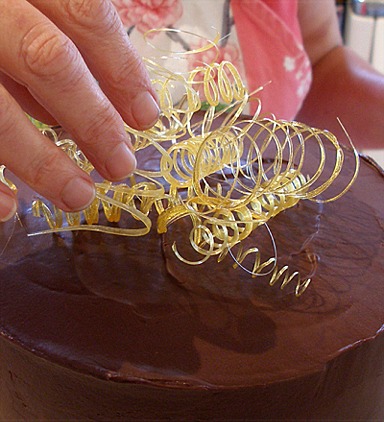
STEP VI: GARNISH THE CAKE WITH CARAMEL SPIRALS AND SERVE
1. Right before serving, stack spirals, decoratively, on the top of the room temperature cake.
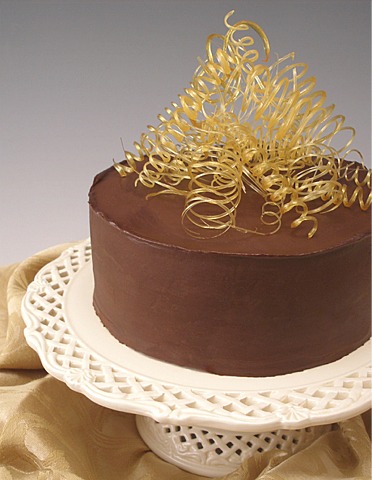
2. Cut the cake with a thin, sharp knife, then dive in!
STORAGE
The cake must be kept refrigerated will it will keep for 1 to 2 days. However, the caramel spirals must be removed beforehand.
Theoretically, the cake can be frozen and kept for about a month, but its quality may suffer. Thaw in the refrigerator in its wrappers.