
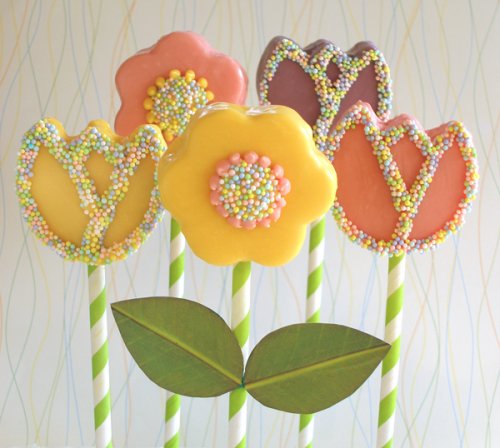
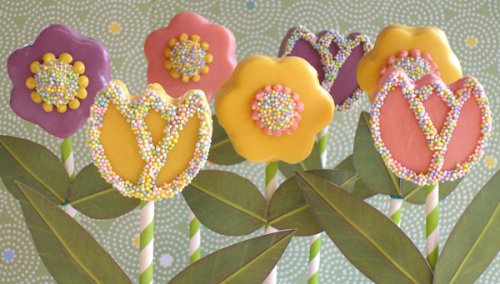
What says Easter and springtime better than colorful flowers and adorable bunnies? For this cake pop project, I used my Yellow Cake for Cakelette Pops recipe. Because it is moist and dense, it is easy to cut with cookie cutters, keeping the edges nice and sharp. I used tulips, daisies, and bunnies, but you can cut out any shapes you like using this same technique. See my advice below for using lollipop sticks and paper straws with these yummy treats!
CAKE RECIPE HELP
INGREDIENTS
1 recipe Yellow Cake for Cakelette Pops Recipe; baked in 2, 9 x 13-inch pans. Cake layers are 3/4-inches high
A few 2- to 3-inch bunny cookie cutter and/or assorted flower cookie cutters – we made Daisies and Tulips; The flower cutters are about 2-inches across and the bunny cutter is about 3-inches high.
NOTE: For best results, we recommend cutters no larger than these sizes.
Recommendations: Wilton Flower Cut-Outs (largest one in set); Wilton 3-Piece Spring Cookie Cutter Set (For the tulip, cut the bottom off the cake after cutting)
5 bags 12-oz. Wilton candy melts in the colors of your choice (We used 1 bag each white, dark cocoa, pink, yellow and violet)
25 to 30 Wilton 8-inch lollipop sticks (can also use Wilton 8-inch cookie sticks) and/ or green/white stripes paper straws, about 10-inches (example)
NOTE: You can use Wilton lollipop sticks for all the cakes if you like, or you can use stiff paper straws; NOTE: Use the lollipop sticks for cutters larger than 2-inches, such as the 3-inch bunnies because they are bigger and heavier than the flowers.
Stiff paper straws are fun, because they come in lots of colors and patters and appear to be the “in” thing in the cake pop world right now. We purchased ours at Michael's Crafts, but they are widely available online as well.
One caveat…while they are stiff, they are not as sturdy as the lollipop stick, and, if you are too rough with them, they can kink and become unstable. So treat them gently!
Wilton squeeze bottles or disposable piping bags(squeeze bottles are preferred).
Parchment paper cones, optional
1 4.8-oz. tube Wilton black sugar pearls sprinkles(for bunny eyes)
1 5.0-oz tube Wilton Spring Mix nonpareils
Optional – for the Daisy and Tulip Flower Cakelettes, STEP V
PRINT 1 or more copies LEAF – DAISY PDF on high quality paper and let the ink dry for several minutes before you proceed.
PRINT 1 or more copies LEAF – TULIP PDF on high quality paper and let the ink dry for several minutes before you proceed.
1 Roll of green garden plant twist tie material or green florist wire; We used green garden twist tie material to make these, but you can also use floral wire that you can find at a craft store. Just make sue that the wire bends very easily.
1 stick glue
INSTRUCTIONS
STEP I: CUT OUT THE CAKELETTES FROM THE YELLOW CAKE
1. On a work surface, remove the edges of the two 9 x 13-inch Yellow cakes by cutting them off with a sharp serrated knife.
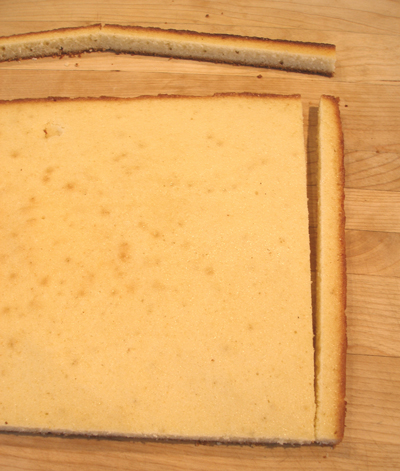
2. Place one of the cakes on a piece of parchment paper.
3. Cut the cakelette shapes out by pressing the cookie cutter straight down through the cake.
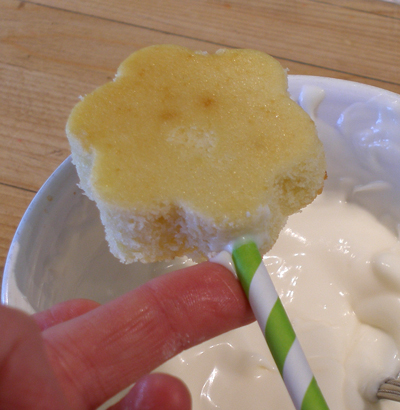
*If you use straws to hold the cakelettes, make sure you cut them from the center of the 9 x 13-inch cake where it is thicker, than from its edges, otherwise the straws will crack the cakelette when inserting.
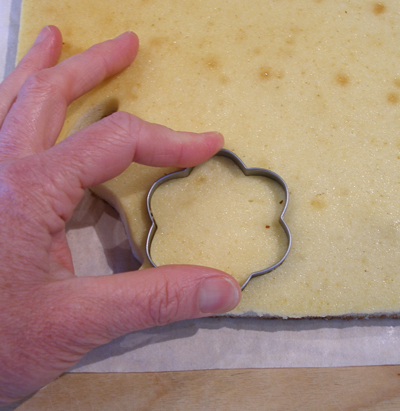
4. Continue to cut out shapes, leaving as little scrap as possible. Place the cut cakelettes on a parchment or waxed paper lined baking sheet and cover them with plastic wrap so the shapes do not dry out while you are working.
STEP II: PUT THE CAKELETTES ON STRAWS OR STICKS
The procedure is the same for both the straws and the sticks.
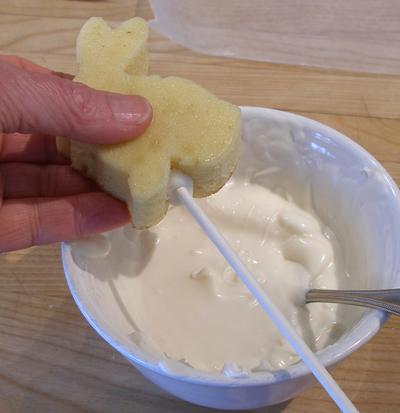
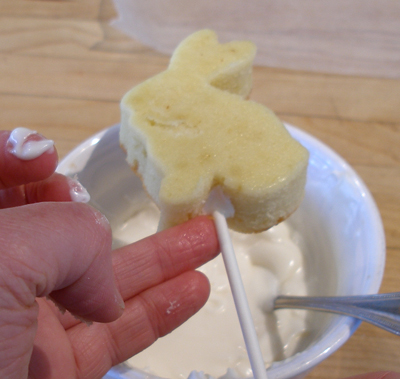
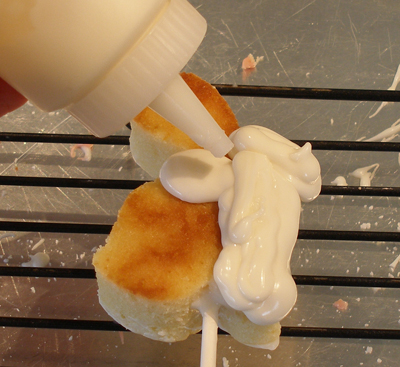
1. Melt about 3/4 cup of white candy melts and stick the last 3/4-inch of the stick(or straw) into the melted candy.
Press the stick into the bottom of the cake, going up about 1/2 way.
Wipe any excess candy off with your finger, then set the cakelette on a baking sheet to let the candy set up.
Repeat this with the rest of the cake shapes.
Place 2-inch Cake Flowers on Straws:
*If you use straws, make sure you cut the cakelettes from the center of the 9 x 13-inch cake where it is thicker, than from its edges, otherwise the straws will crack the cakelette when inserting.

Place 3-inch Cake Bunnies on Lollipop Sticks:
STEP III. COAT THE CAKELETTES ON THEIR STICKS OR STRAWS
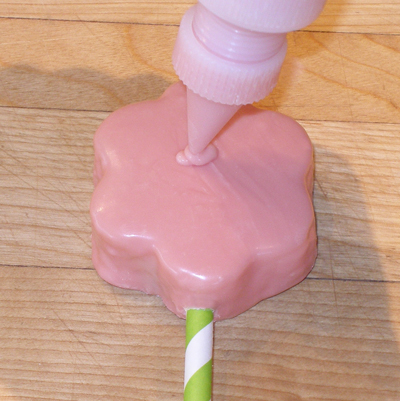
Coat the backs:
The procedure is the same for the rabbits and the flowers.
NOTE: For the flowers, you must decide which colors you are going to work with, so the front and back of the flowers are the same color.
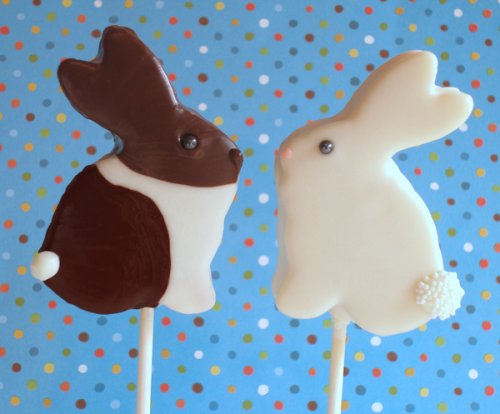
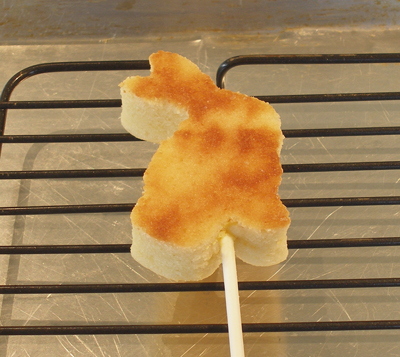
For the rabbits, we made some white bunnies and some brown and white bunnies but they all had white coating on the back.
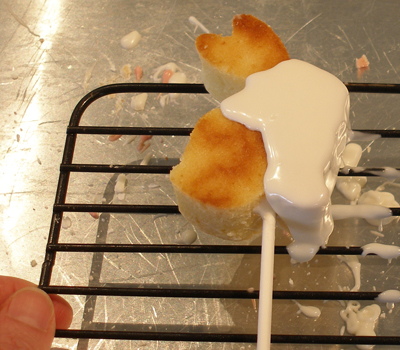
1. Set a wire cake rack over a rimmed baking sheet.
2. Melt about 1 cup of candy melts, at a time, in the color of your choice and put it in a squeeze bottle, if you have them, or a disposable piping bag.
NOTE: The Wilton squeeze bottles are prefect for this job, because they are less messy, and, when the candy melts begin to stiffen up, you can just pop the bottle into the microwave and remelt, because the entire bottle is plastic.
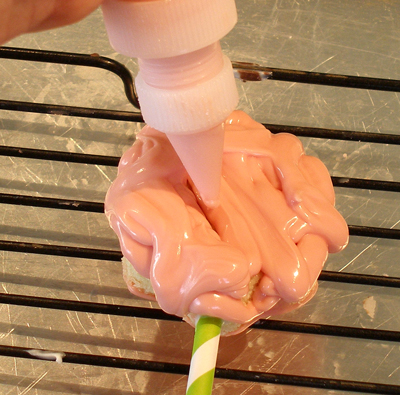
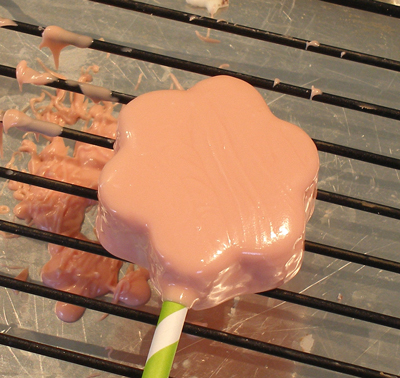
3. Place the cakelette on the rack, then pipe around the circumference with the melted candy, then fill in the outline.
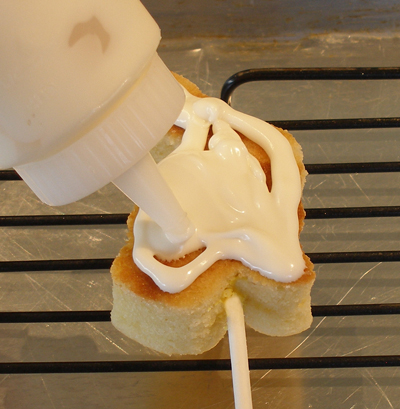
4. Use a small offset spatula to even it out, then tap the rack to flatten the candy into an even layer.
Wipe any drips off the side of the cake with your fingertip.
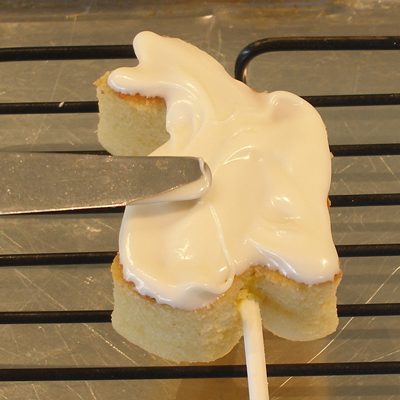
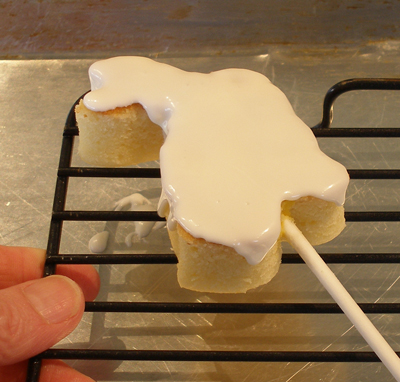
5. Set the cakelette on a baking sheet and repeat with the rest of the cakelettes.
6. When you are done coating the backs, place them into the refrigerator, to set the coating.
Fronts:
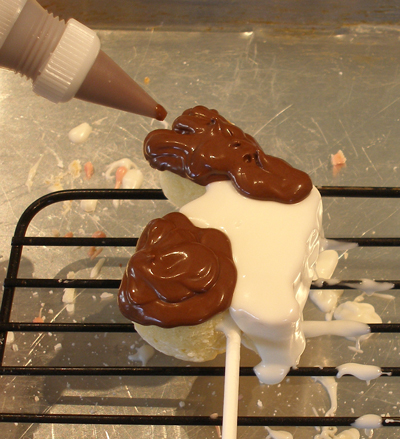
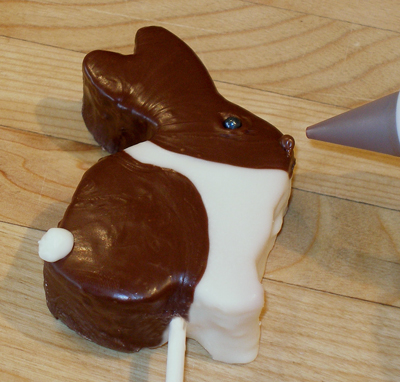
A. For the bunnies
NOTE: Decide whether you want to make solid color bunnies, or bi-color bunnies. The solid white or solid brown colored bunnies are less complicated to make…you just coat them with one color, and you are done.
if you want to make a bi-color bunny, you must have both colors melted, and ready to go, and you must work quickly because the candy coating can set up very quickly.
1. For a bi-color bunny, squeeze a generous amount of white coating on the face chest and front legs of the bunny. Keep in mind that you need enough to entirely coat the sides of the cake, so you use much more coating than when you coated the back of the cakelette.
NOTE: If you are making a plain white or brown bunny, just coat the whole cakelette with the one color, and tap it on the rack to spread and remove the excess.
2. Gently tap the rack to force the coating down the sides of the cakelette.
3. Quickly add the brown coating to the ears and back of the bunny and tap the rack to distribute the coating.
Check the sides of the cakelette to make sure all the sides are coated. if there are any bare spots, drizzle some coating to cover them, and tap the rack again.
4. When the cakelette is entirely coated, use a tweezers to set one Wilton black sugar pearl as the eye in place. The wet coating will cause it to stick.
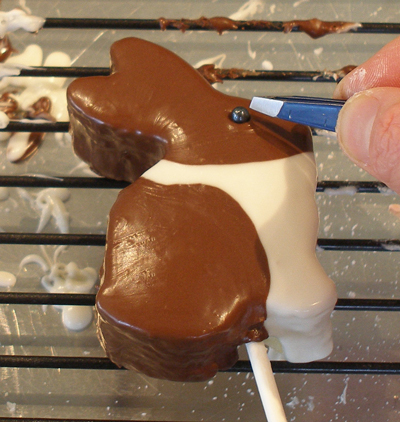
5. Gently scrape the back side of the bunny across the rack to remove any excess coating, then set the coated bunny on a baking sheet.
repeat the process with the rest of your bunnies, then set the baking sheet in the refrigerator to set the coating.
B. For the daisy and tulip shapes
Match the front color of your flower to its back color, then melt the candy coating, about 1 cup at a time.
1. Squeeze a generous amount of coating on the top of the flower cakelette on a straw and tap the rack to spread.
2. Place the coated flower on a baking sheet, then place the baking sheet in the refrigerator to set the coating.
3. Repeat with the remaining flowers.
STEP IV: FINISHING TOUCHES
A. For the Bunnies
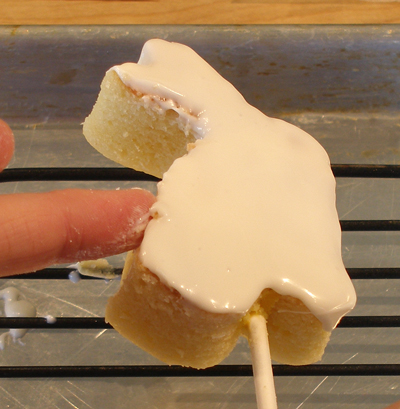
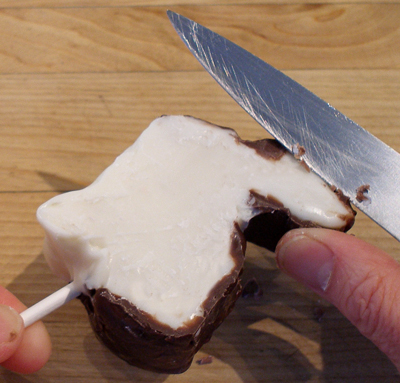
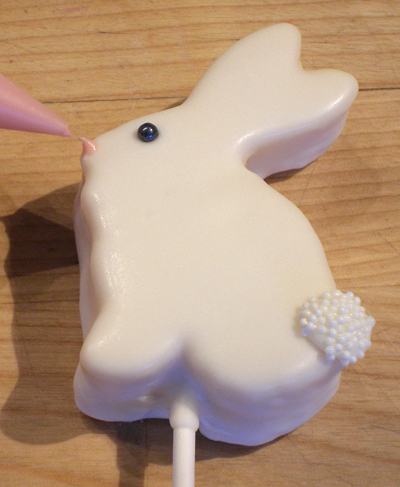
1. Remove the coated bunny cakelettes from the refrigerator.
2. Trim any excess coating off the back of the cakelette with a sharp paring knife, just to neaten things up. Be gentle; you do not want to crack the coating.
3. Melt a small amount of white coating, or remelt, if you have any left over from the coating process. Place it in a squeeze bottle, a disposable piping bag, or parchment paper cone.
Pipe a little white tail on the bunnies.
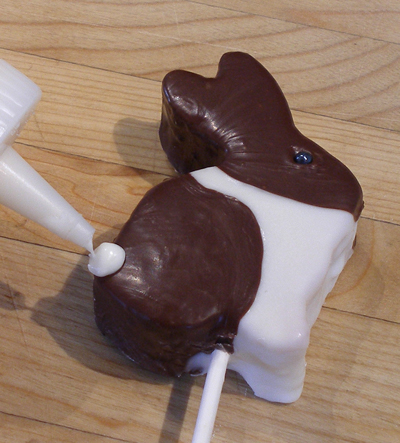
4. Melt a small amount of brown or pink coating, or remelt, if you have any left over from the coating process. Place it in a squeeze bottle, a disposable piping bag, or parchment paper cone.
Pipe a little brown or pink nose.
As you can see from the photo below, we sprinkled some white nonpareils on the bunnies tail before the candy melts set. This is optional, but it looks pretty darn cute.

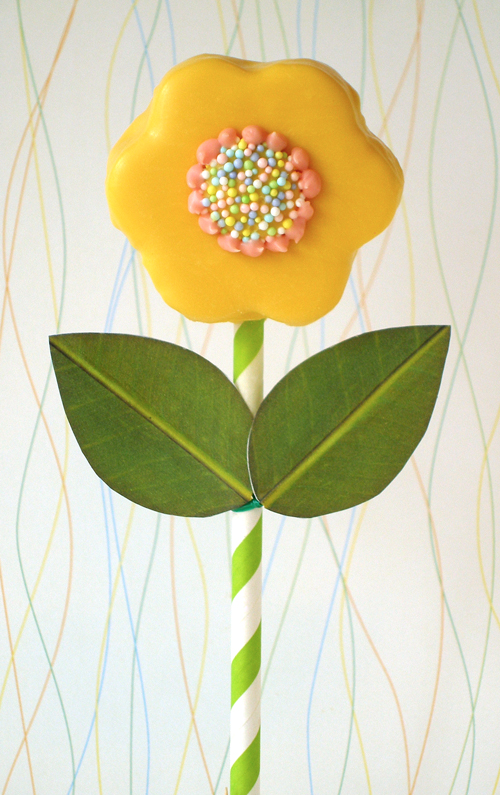
B. For the Daisies
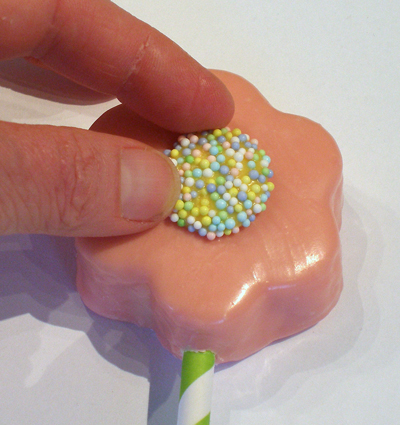
Make the Premade Daisy Centers
While the flower cakelettes are in the refrigerator, you can prepare the daisy flower centers. You should work in small groups because the sprinkles won't stick if the candy coating starts to set up.
1. Melt about 1/2 cup of yellow candy melts and put it in a squeeze bottle.
2. Place a piece of parchment on a rimmed baking sheet. DO NOT do this on your counter, or you will be stepping on sprinkles in your kitchen for the rest of your life! The rimmed baking sheet helps keep the sprinkles from going all over the place. Believe me, you will thank us for this tip. 🙂
3. Squeeze out 5 mounds that are about 1/2 inch across onto a piece of parchment paper.
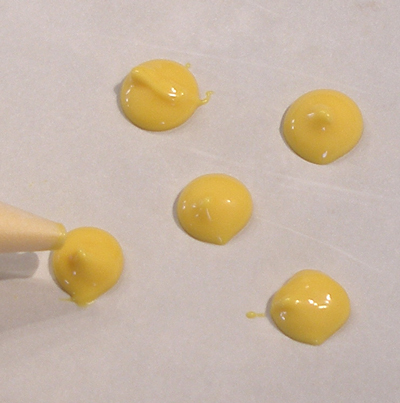
4. Sprinkle the mounds with Wilton Spring nonpareils. Repeat until you have as many centers as you need.
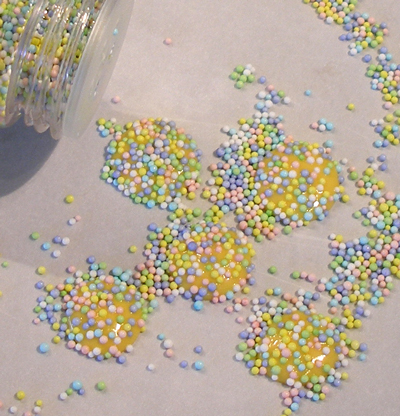
5. When finished, set the centers in the refrigerator to set up; it doesn't take long.
Apply the Premade Daisy Centers
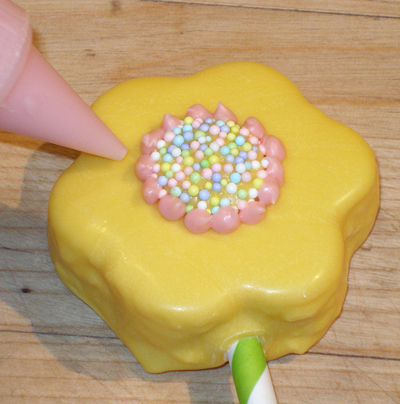
1. Remelt some of the coating that is the same color as the flower you are working on.
Place it in a squeeze bottle, a disposable piping bag, or parchment paper cone, and pipe a little dab in the center of the flower.
2. Place one of the premade daisy centers, from A, above on the dab of coating and set into place.
3. Melt or remelt a small amount of pink coating and pipe small dots around the perimeter of the flower centers.
If you are making pink or violet daisies, use yellow coating for this step.
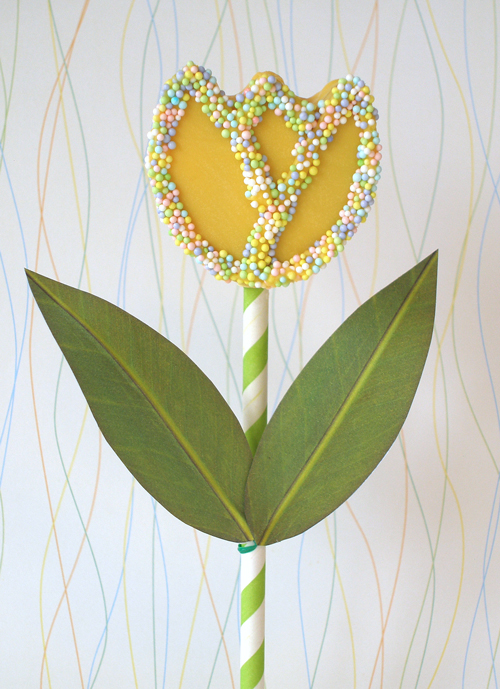
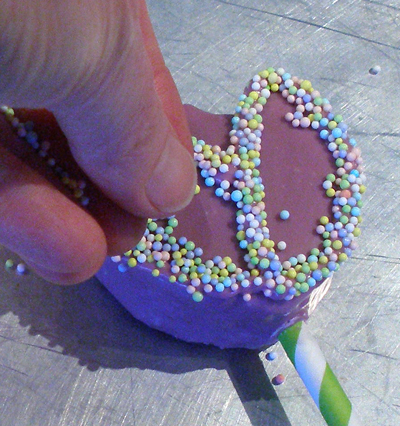
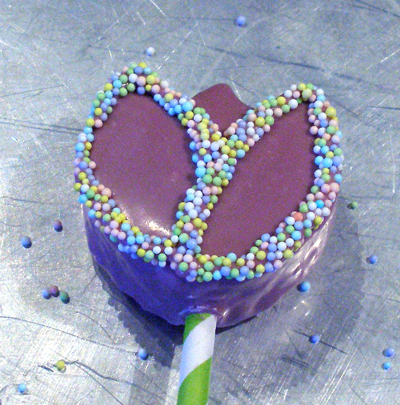
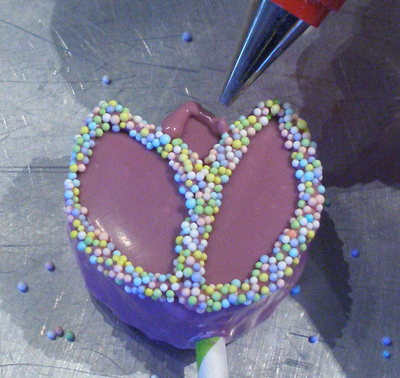
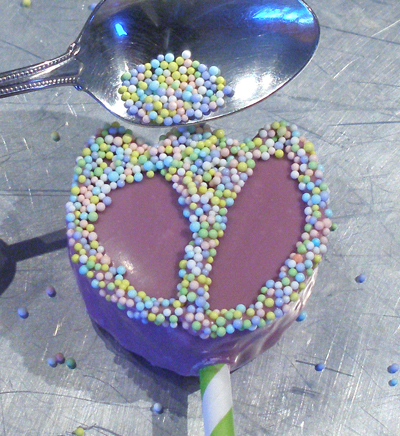
D. For the Tulips
1. Remelt coating of the same color tulip you are working on. Place it in a squeeze bottle, a disposable piping bag, or parchment paper cone.
2. Pipe an outline, one section at a time, then sprinkle the outline with nonpareils.
3. Tip the tulip over to remove the excess sprinkles, then pipe and coat the next section.
NOTE: You cannot pipe and coat all three sections at once, because the coating will set up and the nonpareils will not stick.
Take it from us…been there, done that! 😉
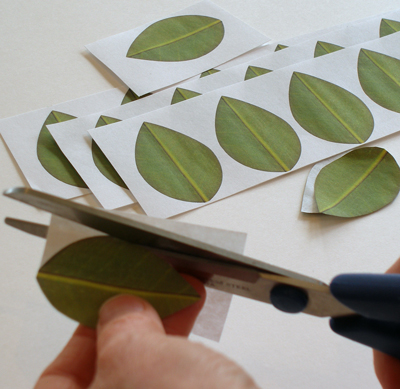
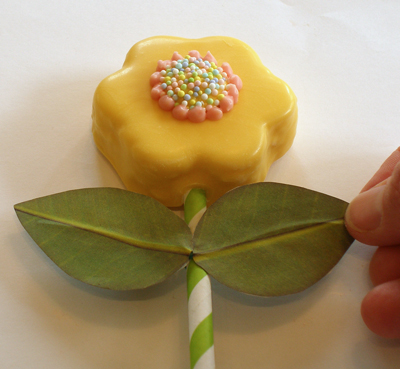
STEP V: OPTIONAL – MAKE THE LEAVES FOR THE FLOWER CAKELETTES
This step is totally optional, but we think the leaves add a lot to the Daisy and Tulip cakelettes and take them to another level, visually.
1. PRINT 1 or more copies LEAF – DAISY PDF on high quality paper and let the ink dry for several minutes before you proceed.
PRINT 1 or more copies LEAF – TULIP PDF on high quality paper and let the ink dry for several minutes before you proceed.
2. Cut the twist/tie wire:
For the Daisy flower leaf template, cut 4.5-inch lengths of twist tie/wire for each flower.
For the Tulip leaf template, cut 6-inch lengths of twist tie/wire for each flower.
3. Cut the leaves out with scissors.
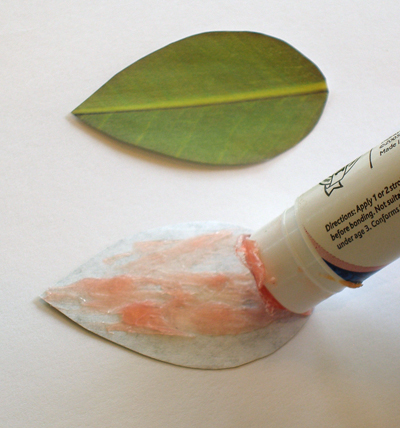
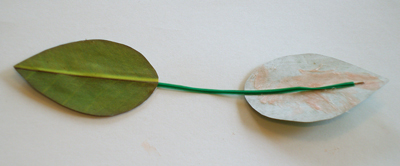
4. Coat the back of one leaf with glue stick then place the twist tie on the glue, down the center of the leaf.
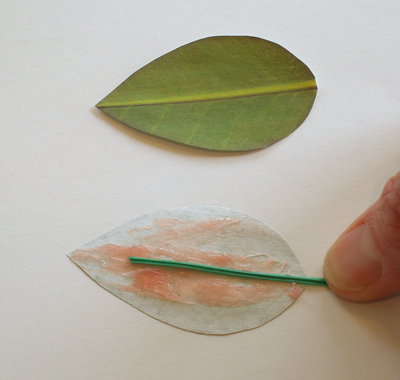
5. Coat the center of the second leaf with glue, then place it over the first leaf and press it to adhere.
6. Coat the back of another leaf with glue, then set the other side of the twist tie in the center of the leaf.
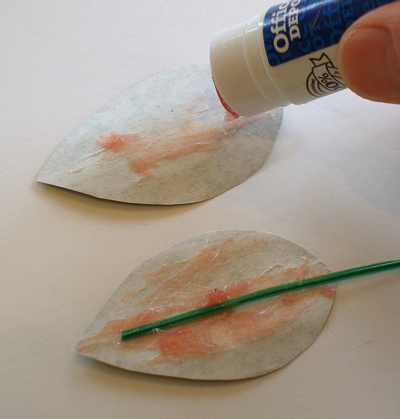
Rub some glue on the center of another leaf and set it on top of the bottom leaf and press to adhere.
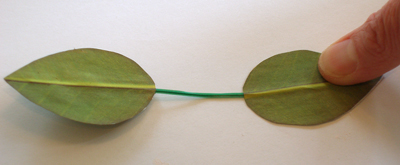
7. Repeat this process until you have as many leaf sets as you need. Let the glue set up for at least 20 minutes before you attach the leaves to the cakelette sticks.
The process for the tulip leaves is exactly the same, but you use a longer length of wire.
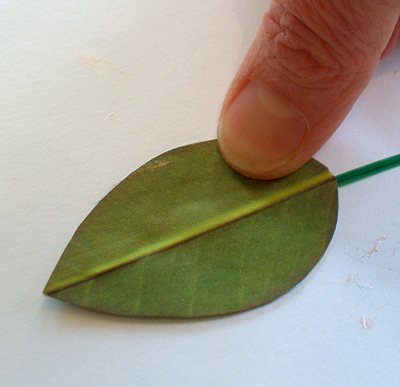
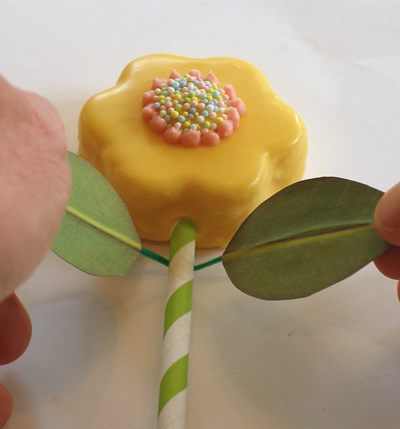
8. After the glue has set up for at least 20 minutes, you can attach the leaf sets to your cakelettes.
Wrap the wire around the stem, to the front of the pop, then twist the wire. Gently press the wire to tighten, so the leaves don't slip down the “stem”.
STORAGE
Store cakelette pops at room temperature for a few days, wrapped well.