Puff Pastry Dough Tutorial
Recipe by Sarah Phillips; Food styling and photos by Kelly Hong © 2010 Sarah Phillips CraftyBaking.com

Originating in France, they call Puff pastry, Pâte Feuilletée or leafed pastry because of its many leaves or layers. Puff pastry is the king of pastries -- crisp, buttery, flaky and especially light. It is used to make a variety of crisp creations including croissants, Napoleons, Palmiers and Allumettes. Since Puff Pastry doesn't contain sugar, it makes a perfect wrapping for various savory and sweet foods such as meats, cheese and fruit. It can be made at home or purchased from the supermarket in the freezer section as ready-made.
PASTRY RECIPE HELP
Recipe used with the:
 Palmier or Elephant Ears Tutorial
 Vol-au-Valentines Tutorial
 Chocolate Ganache Napoleons Recipe
Secrets
When processing the ingredients in a food processor, do NOT let the processor run continuously, otherwise the dough will become too smooth and you will overdevelop the gluten in the moistened wheat flour.
It is very important to keep gluten development to a minimum in this recipe, or the finished puff pastry will be tough and chewy instead of delicate and crispy.
INGREDIENTS
2 1/2 cups unbleached all-purpose flour; spoon into measuring cup and level to rim
1 1/4 cups bleached cake flour; spoon into measuring cup and level to rim
1 1/2 teaspoons salt
1 1/4 cups ice water
1 pound (2 cups) unsalted butter; very cold and very fresh!
plus extra unbleached all-purpose flour for dusting work surface
INSTRUCTIONS
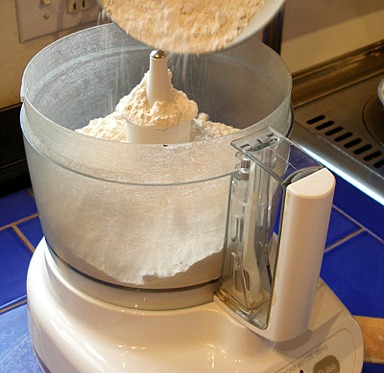
1. In the bowl of a food processor, fitted with a steel blade, place the all-purpose flour, cake flour, and salt.
Pulse the mixture a few times, to combine.

2. Add most of the water, through the food processor's feed tube, while the machine is turned off.

3. Pulse the food processor. Stop pulsing as soon as the ingredients begin to form a dough and pull away from the side of the bowl.
If the dough appears too dry and does not come together, add the remaining water and pulse the food processor just until combined,
or until the dough JUST forms a cohesive mass that forms a ball on the blade.
The finished dough should be soft and pliable and bumpy, not smooth.


SARAH SAYS: If the dough is crumbly and dry, add a few drops of water at a time, and then, pulse the food processor to combine.
Similarly, if the dough is very sticky and wet, add a teaspoon of flour at a time, and pulse after each addition to correct.
It is better that the dough be soft, slightly tacky and pliable, rather than dry. Do NOT overprocess.
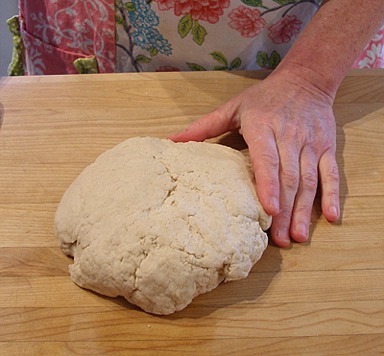
4. Remove the dough from the processor onto a clean worksurface. Gently form it into a flat disk without kneading the dough.

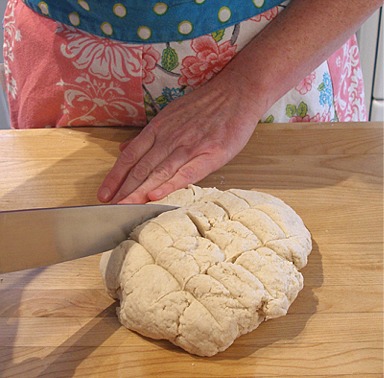
5. With a large, very sharp knife, slash the top of the ball with a tic-tac-toe pattern, without pressing down hard.
Do not cut all the way through.
6. Wrap the dough in a very slightly dampened kitchen towel.
Place it in the refrigerator to rest for 10 - 20 minutes.

SARAH SAYS: For longer term storage, take off the kitchen towel, wrap the dough in plastic wrap, and then, place in a resealable plastic bag. The dough can be stored for a couple
of days in the refrigerator or frozen for a month.
STEP II: MAKE THE BUTTER BLOCK AND ENCLOSE IT IN THE DOUGH (PUFF PASTE)
The butter and dough must remain cool at all times. The butter should remain pliable, as well.
Make the butter block:
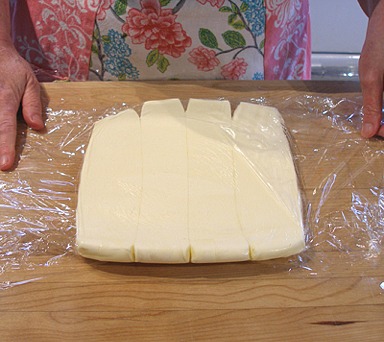
1. While the dough is resting, take the butter from the refrigerator and place the sticks of butter, side by side, on a sheet of plastic wrap.

2. Cover the butter with another piece of plastic wrap. Use the side of a rolling pin to give it a few quick raps. This will soften the butter.
Keep the butter shaped in a square.
Then roll the butter, till it flattens into a uniform 7 3/4-inch square.
SARAH SAYS: The butter must remain pliable, but cold. It will crack if it is too cold or become greasy if too warm. Avoid both scenarios.


3. Place the butter square back into the refrigerator and remove the puff paste dough.
Unwrap the dough and place it on a lightly floured work surface.
KELLY CA SAYS: I like to use a silpat counter mat. A marble slab is also an excellent option, if you have one.

4. Press the dough with your rolling pin, to flatten it a little.
Start rolling from the center of the dough.
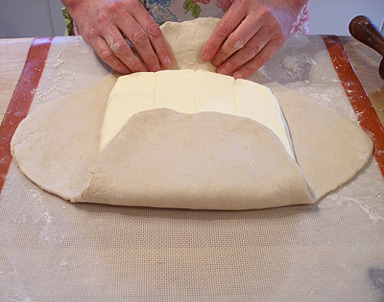
Continue to roll the dough out, with 4 elongated flaps of dough, each being 1/4-inch thick, with a thicker pad in the center, about 1-inch thick.


5. Take your square of butter out of the refrigerator and unwrap it. Place it in the center of the dough.


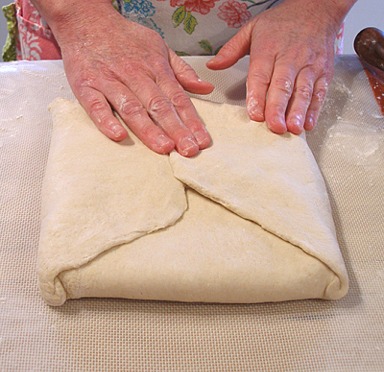
6. Fold the "flaps" over the butter, completely enclosing it in a dough package. Press the dough together where they meet.
You should now have a square that is about 8-inches across.
SARAH SAYS: It is vital that the butter be enclosed in the dough package at ALL times for the puff pastry to leaven properly and rise in the oven.


NOTE: If it is a very hot day, or if your kitchen is very warm, wrap the dough package in plastic wrap and place it in the refrigerator to chill, before you attempt to roll it out.
When making puff pastry, it is important to keep your dough cold at all times.
If the dough is cold, you can make your first two "turns" now.
STEP III: COMPLETE THE SIX PUFF PASTRY TURNS
You will need to give the dough six single, folds, allowing the dough to rest in the refrigerator for minimum of 30 minutes up to one day, after every 2 folds.
If the fat becomes too warm thoroughout the series of turns, it melts and breaks through the dough layers, during baking
and the pastry will not rise properly and will become greasy.
First and second turns:
1. When you roll out your puff pastry, make sure your work surface is well floured.

2. Press your rolling pin firmly down the length of the dough to flatten it a bit, and then begin to roll it into a rectangle that is about 10- wide x 24-inches long.
Try to keep the sides of the dough as straight as possible, as well as an even thickness.


3. Use a dry pastry brush and brush off any excess flour from the top of the dough.

4. Make your first turn, by folding the rectangle up from the bottom, and down from the top, like a business letter.
SARAH SAYS: It is also called a letter fold because it resembles the way a letter is folded.


5. Neaten up the edges of your dough package by gently pushing in the edges of the dough with your palms. You have now completed one turn.

Second turn:
If your dough is still cold, you may continue with your second turn.
If butter is oozing out of your dough, it is too warm. Wrap it in plastic and refrigerate for at least 30 minutes before you do your second turn.
6. To make the second turn, pick up the dough package turn it, so the fold is to YOUR left, like the spine of a book.


7. Make sure your work surface is well floured.

8. Press your rolling pin firmly down the length of the dough to flatten it a bit.

9. Roll out to a 10- wide x 24-inch long rectangle. Try to keep the sides of the dough as straight as possible, as well as an even thickness.

10. Brush away excess flour and fold like a business letter.


11. Neaten the edges.

12. Mark the dough with two finger indentations, indicating that you have done two turns.
Then, wrap the dough in plastic and chill it for a minimum of 30 minutes or up to 1 day.


Third and Fourth Turns:
1. After 30 minutes, remove dough package from the refrigerator, unwrap and do two more turns, repeating Step STEP III, #s 1 -12, above.
2. After that, mark the dough with 4 finger indentations to indicate you have completed four turns, and re-wrap it in plastic.
Fifth and Sixth Turns:
1. Refrigerate the dough for 30 minutes and repeat the fifth and sixth turns, repeating STEP III, #s 1 -12, above.
2. After you have completed the required 6 turns, wrap the dough in plastic and place it back in the refrigerator.
3. You must let the dough rest in the refrigerator for at least an hour or two before you use it. Then it will be ready to be rolled and formed into the shape required.
STORAGE
After completing six turns, the finished puff pastry will keep, well wrapped in plastic wrap, in the refrigerator for one day or in the freezer for up to two months.
Thaw in the refrigerator in its wrappers; allow for a day.