Grilled Pizza - Three Variations
Recipe by Sarah Phillips and Kelly Hong; Food styling and photos by Kelly Hong © 2007 Sarah Phillips CraftyBaking.com

Kelly Says: When it's really hot outside and your tummy is yelling for pizza, don't turn on the oven or call your local delivery place, turn on your grill! Grilling pizza is great fun and the results are delish! It has been as hot as Hades around here but I was craving pizza, so, I decided to make grilled pizza.
The crust is divine...nice and chewy and, well, it's perfection. The grill gives the crust really nice caramelization and crispness, plus it doesn't heat up your kitchen.
Using Sarah Phillips’ No-Cook Zesty Tomato Sauce really speeds up the process and, besides, it's really, really good! OK, I must admit, I am VERY picky about tomato sauce, being 1/2 Italian and all, and I LOVE this sauce for pizza! I was ready to be down on it, I must confess. It exceeded my expectations by a million miles! I LOVE the tang that the Balsamic vinegar gives to Sarah's no-cook sauce.
I made 6 pizzas (2 each) from 1 recipe:
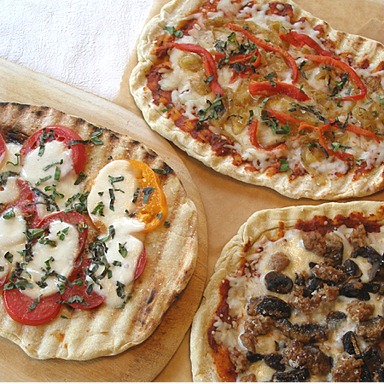
1. Grilled Roasted Red Pepper and Caramelized Onion Pizza
2. Grilled Cheese, Mushroom and Sausage Pizza
3. Grilled Pizza Caprese which is our take on the popular Insalata Caprese...a salad with fresh tomato slices and fresh mozzarella and basil leaves
Grilling pizza is a very fast-paced activity. You MUST have your sauce and toppings all prepared and ready to go before you start. I have a gas grill, but, if you have a charcoal grill, you can also grill pizza, if you use an indirect heat method.
BREAD RECIPE HELP
Secrets
My grill has cast iron grates and they really hang onto the heat, so I turn mine down to LOW after the initial preheat. I imagine that some grills may have to be on Medium, or, they may have to adjust the heat as they go. If the grill is too hot, the crust really gets burned, FAST.
STEP I: MAKE THE RECIPES
1 recipe Napoletana Pizza Dough; will yield six dough balls.
Shape each dough ball: STEP 3: MAKE THE PIZZAS When the dough is stretched out to your satisfaction (about 9 to 12 inches in diameter for each 6-ounce piece of dough), lay it on back of a sheet pan dusted with semolina flour or cornmeal, making sure there is enough to allow it to slide. You should have six formed pizza dough crusts.
1 recipe Sarah Phillips’ No-Cook Zesty Tomato Sauce
1 recipe Kelly’s Garlic Oil
INSTRUCTIONS
Place the olive oil in a pan. Press the garlic cloves through a garlic press into the oil. You just heat this until the garlic sizzles. Take from heat and let it cool.
STEP I: GRILL THE FIRST SIDE OF THE PIZZAS
There are many ways to grill pizza but this is the method that works best for me.
I like to grill one side of all of my dough first. Then I take the grilled crusts into the house, top them and take them back out to the grill.
Some people recommend turning your dough and building your pizzas right at the grill. I find this method too hot and too stressful.
Do it my way and you will be cooler and stress-free.
1. Preheat your grill for about 15 minutes on HIGH and then clean the grates.
When the grates are clean, reduce your burners to LOW and oil the grates with oil.
KELLY SAYS: I like to use olive oil.
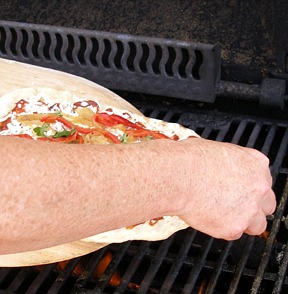
2. When your grates are oiled, take your formed crust, which is on a floured peel and slide it onto the grill. If you do not have a peel, you can use a rimless cookie sheet or the back of a rimmed one

My grill is big enough for two crusts so I cook them two at a time! Keep the other dough, not being grilled, in the kitchen, covered at all times.
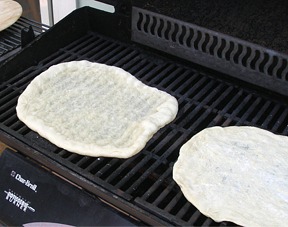
3. Close the grill and let the bottom of the crusts cook for a couple minutes. Depending on the heat of your grill, the cooking time can be VERY fast. You must keep checking under your dough to make sure they are not burning. The best tool for this job is a pair of tongs. Grab one corner of the dough and lift it up. If it sticks to the grill, use a metal spatula to get the pizza dough up. Scrape the grill clean and grease, again, and place the pizza back on to resume cooking.

4. When your dough is sufficiently browned on the grilled side, remove it from the grill and place it on a baking sheet.
The non-grilled side of the dough, while not fully cooked, is cooked enough so that it won't stick to the baking sheet, or the other crusts.


When all 6 of your crusts are grilled on one side, it is time to begin building your pizzas.
STEP II: MAKE THE PIZZAS
GRILLED ROASTED RED PEPPER AND CARAMELIZED ONION PIZZA
Makes 2 Pizzas
INGREDIENTS
Two Napoletana Pizza Crusts from one recipe, Grilled on one side
1/2 cup Sarah Phillips’ No-Cook Zesty Tomato Sauce, divided
1 1/2 cups shredded mozzarella cheese, divided
1 cup caramelized onions, divided
1/2 cup roasted red pepper strips, divided
2 teaspoons Kelly's garlic oil, divided
4 teaspoons chopped fresh basil, divided
INSTRUCTIONS
KELLY SAYS: I thought it might be nice to show you how to caramelize onions!
Peel and slice your onion. Cut the onion in half and then lay the onion on the flat side and cut it into thin slices. Set aside.
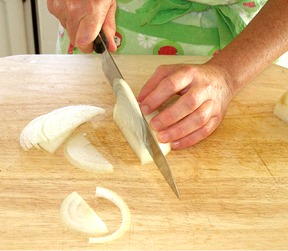
Put the 2 teaspoons of olive oil into a large frying pan and add the sliced onions.

Sprinkle the onions with a small pinch of salt and a few grinds of pepper.
Start the onions on high heat and cook, stirring occasionally, until they begin to look translucent. You will now begin to caramelize the onions.

When the onions are translucent, turn the heat down to low and cook them, stirring, till they start to turn a lovely golden brown. This takes 10-15 minutes. Do not let them go very long without stirring, or they will burn. Keep and eye on them! Once they burn, they do not taste good! Set the onions aside to cool. Then, measure the amount needed for your recipe.

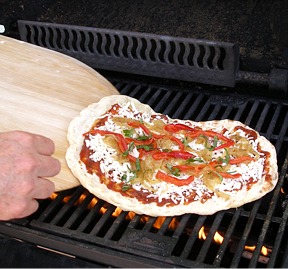
1. Place one crust on a lightly floured pizza peel. This will help when you transfer your dough back onto the grill.
2. Spread a 1/4 cup Sarah's No-Cook sauce on the GRILLED SIDE of one of the crusts.

3. Then add your toppings: 3/4 cup cheese first and then 1/2 cup caramelized onions and 1/4 cup red pepper strips. Drizzle with 1 teaspoon garlic oil and then sprinkle with 2 teaspoons chopped basil.


4. Repeat topping the second pizza crust.
5. Now it is time to take the topped pizza crust back to the grill.
Preheat your grill for about 15 minutes on HIGH and then clean the grates.
When the grates are clean, reduce your burners to LOW and oil the grates with oil. KELLY CA SAYS: I like to use olive oil.
ABOUT GRILLS: My grill has cast iron grates and they really hang onto the heat, so I turn mine down to LOW after the initial preheat. I imagine that some grills may have to be on MEDIUM, or, you may have to adjust the heat as they go. If the grill is too hot, the crust really gets burned, FAST.
Grab the end of the dough with your fingers or a pair of tongs and slide it back onto the hot grill.
6. Close the lid of the grill and cook each pizza for about 3 to 4 minutes or until the cheese is melted and the bottom of the crust is cooked to your liking.
Closing the lid creates and oven-like effect and helps the cheese to melt faster. You really have to keep on it, though, so the bottom of the crust doesn't burn. If you find that one side of your crust is charring, simply turn it away from the hot spot. You must be alert when you grill pizza. The tell-tale burnt toast aroma tells you that your pizza needs tending to.
GRILLED CHEESE, MUSHROOM AND SAUSAGE PIZZA
Makes 2 Pizzas

The mushroom sausage pizza building is basically the same process as described above, with different toppings. I sautéed the mushrooms ahead of time because grilling does not allow enough time for them to cook sufficiently, also, they release a lot of water when cooking, which is not good, in the pizza world. I use bulk Italian sausage, that is, sausage without a casing. I brown it ahead of time and set it aside.
INGREDIENTS
Two Napoletana Pizza Crusts from one recipe,
1/2 cup Sarah Phillips’ No-Cook Zesty Tomato Sauce, divided
1 1/2 cups shredded mozzarella cheese, divided
1 cup cooked sliced mushrooms, divided
1 cup cooked bulk Italian sausage, divided
INSTRUCTIONS
1. Place one crust on a lightly floured pizza peel. This will help when you transfer your dough back onto the grill.
2. Spread 1/4 cup Sarah's No-Cook sauce on the GRILLED SIDE of one of the crusts.
3. Then add your toppings: 3/4 cup cheese first, 1/2 cup mushrooms and then, 1/2 cup cooked sausage.


4. Repeat topping the second pizza crust.
5. Grill the pizzas. Close the lid of the grill and cook the pizza for about 3 to 4 minutes or until the cheese is melted and the bottom of the crust is cooked to your liking.
GRILLED PIZZA
Makes 2 Pizzas
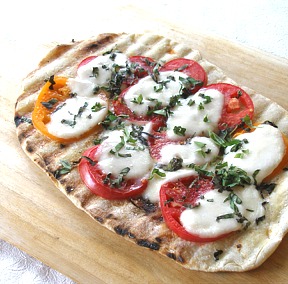
I LOVE Insalata Caprese, especially at the height of tomato season, when tomatoes are at their peak of flavor. This pizza is inspired by that salad. I call it Grilled Pizza Caprese. There is no sauce on this pizza, just fresh tomatoes, mozzarella, and basil.
INGREDIENTS
Two Napoletana Pizza Crusts, Grilled on one side
2 teaspoons garlic flavored olive oil, divided
2 tablespoons fresh basil, cut in a chiffonade, divided
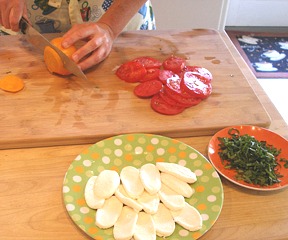
2 large tomatoes. thinly sliced, divided
1 1/2 cups fresh mozzarella, cut in rounds, divided
Salt and pepper, to taste
KELLY SAYS: I thought it might be nice to show you how to do a chiffonade of basil. It sounds fancy, but don't let the fancy name scare you!
First you wash your basil leaves and then stack them on top of each other in a pile.

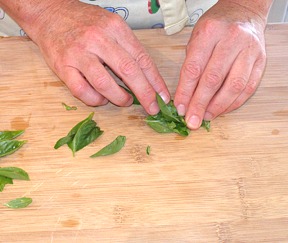
Once you have your stack, you roll the stack into a cylinder

After your leaves and rolled up, take a sharp knife and cut down, making narrow strips. Measure or approximate the amount needed for the recipe.

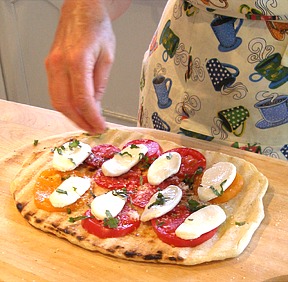
1. Once you have your garlic, oil, your basil and tomatoes all cut, it is time to build your grilled Pizza Caprese.
Place a grilled crust on your peel and drizzle it with some garlic oil. Don't go overboard, you want it for flavor, you don't want to create a grease slick on your pizza. This will make your toppings slide right off and that would be wrong, on so many levels.

2. Next, add your sliced tomatoes.
My garden tomatoes are very meaty, that is, they have more flesh than juice and seeds. This is a good thing when it comes to making pizza.
If you find that your tomatoes are very juicy, you can drain them on paper towels for a few minutes, after you slice them.

3. Sprinkle salt and freshly ground pepper on top.

4. Add your fresh mozzarella rounds.

5. Sprinkle the top with basil.
6. Repeat with the second pizza.
7. Now, take both back out to the grill and finish the cooking in the same manner as described above.
This is the delectable result:
When you're all done grilling, you sit down to enjoy a pizza feast.
A big salad and a nice glass of red wine and, well, it's heaven on a plate!