Cherry Pink Chiffon Cupcake Decorating Tutorial
Recipe by Sarah Phillips; Food styling and photos by Kelly Hong © 2010 Sarah Phillips CraftyBaking.com
Variation: Blue “Velvet” Chiffon Layer Cake
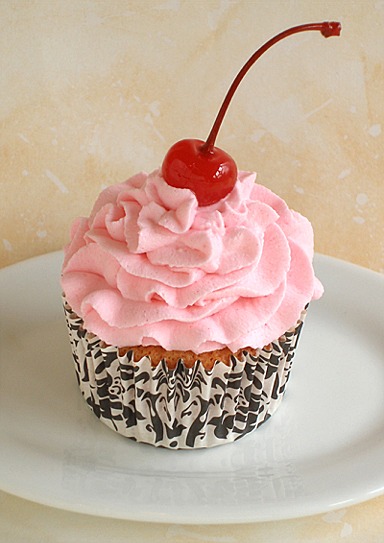


If you are making the Cherry Pink Tuxedo Mini-Cake and Cupcakes, the recipe makes one 5 x 2-inch four layer cake and 10 to 11 cupcakes; this is the cupcake decorating tutorial. Or, you can just bake the recipe and make about 14 -16 cupcakes without making the cake. These are cute cherry cupcakes made with the bare minimum of food dye and decorated with chocolate, cherries and pink whipped cream! We also filled ours with chocolate, and show you how. You can switch-up the flavors and make them with our Blue “Velvet” Chiffon Layer Cake, instead.
CAKE RECIPE HELP
What you need for this tutorial:
1 recipe Cherry Pink Tuxedo Mini-Cake and Cupcakes (makes 14 - 16 cupcakes if just use the recipe to bake cupcakes), or 10 - 11 Cherry Pink Tuxedo Cupcakes baked and cooled if also make the 5- x 2-inch mini-cake recipe
Frosting:
1 recipe Pink Almond Whipped Cream Frosting, below
Filling:
1/4 cup whole fruit cherry preserves
1 recipe Chocolate Cake Glaze, or remainder from the Cherry Pink Tuxedo Mini-Cake and Cupcakes Recipe
Garnish:
10 - 11 Maraschino cherries, for decoration
STEP I: MAKE THE PINK ALMOND WHIPPED CREAM FROSTING
PINK ALMOND WHIPPED CREAM FROSTING / recipe alone
Makes enough for 10 - 11 (and up to 14 - 16 cupcakes)
INGREDIENTS
Gelatin:
3 tablespoons cold water.
1 1/2 teaspoon unflavored gelatin
Whipped Cream:
2 cups (1 pint) chilled whipping cream
1 1/2 teaspoon vanilla extract
1/4 teaspoon almond extract
3 to 4 drops deep pink gel food coloring, Americolor
4 tablespoons sugar
INSTRUCTIONS
1. Prepare the gelatin:
A. Place the dry gelatin in a small bowl. Pour cold water over it. Let soak for 5 minutes.
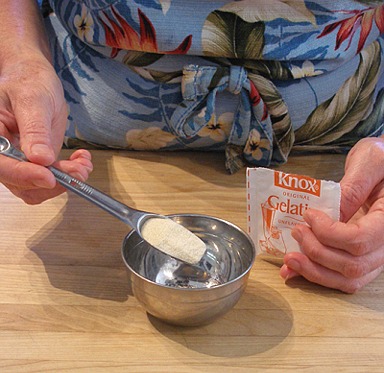

B. Dissolve by placing it in a container over a small pot of simmering water. Set aside to let cool.
NOTE: Alternatively, you may dissolve the gelatin by heating it for 20 seconds in the microwave, under low power. Do not let it overheat. Let cool.
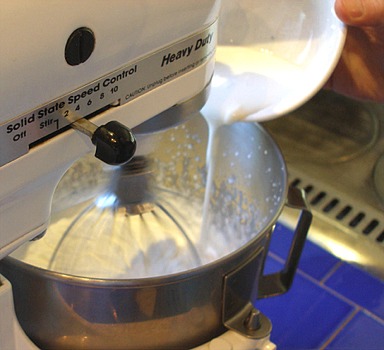
2. Prepare the whipped cream:
A. Place the empty bowl in the freezer to quickly chill.
Using an electric mixer, fitted with a whisk attachment, beat cream on high speed in its pre-chilled mixer bowl.

B. Just before it becomes soft and billowy, slowly add the sugar and vanilla and almond extracts to the whipped cream at the sides of the bowl.
Continue to whip on high as you do.


C. Whip the cream until it barely starts to stiffen. Stop the mixer.
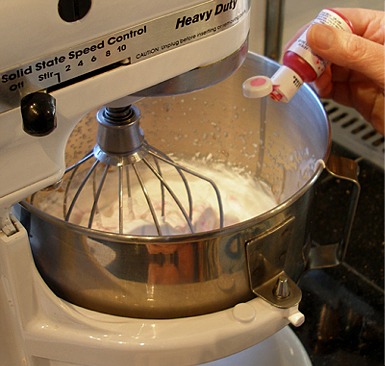
D. Add melted and cooled gelatin to the cream mixture.
KELLY SAYS: I find there is less tendency for the cooled gelatin to for blobs in the finished whipped cream using my method:
1. First, take about 2 tablespoons of the cream from the mixer bowl.
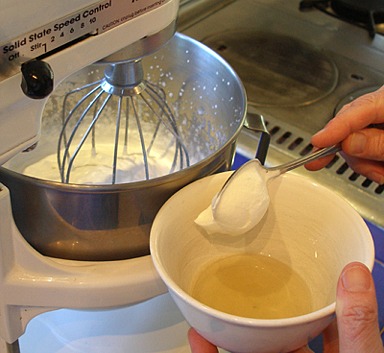
2. Stir it into the cooled gelatin.
3. Return the cream/ gelatin mixture back into the main mixing bowl:
Turn the mixer on to high. with the rest of the semi-whipped cream.
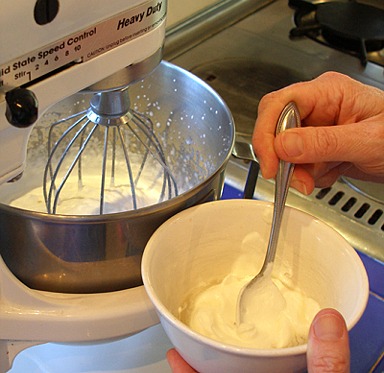
E. Then add pink food coloring. First, stop the mixer. You can add as little, or as much as you like, but pastels work best.
F. Continue to whip the cream on high until soft peaks form. Stop the mixer.
3. Cover and refrigerate the whipped cream until needed.
STORAGE
Perishable. Must keep refrigerated where it will keep for a few days. Does not freeze. Before using, Refluff, if necessary, with a few beats of a large balloon whisk; do not rebeat.
STEP II: FILL AND FROST THE CUPCAKES. SERVE
INSTRUCTIONS
Fill:
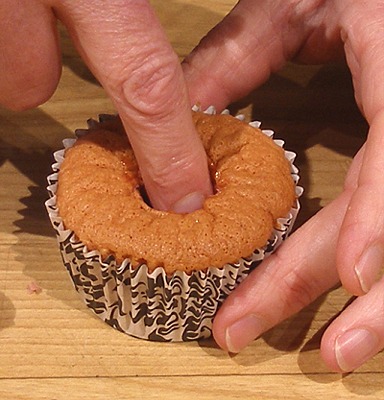
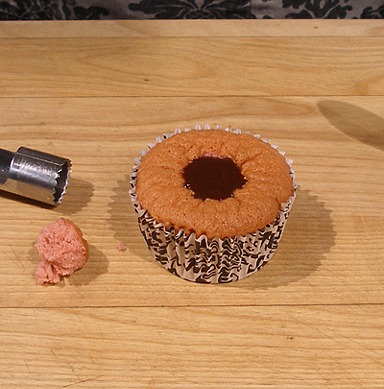
1. Starting with one cupcake at a time, push an apple corer 3/4 of the way into the cupcake and twist. DO NOT go all the way through the cupcake!
Pull corer up and remove the core of the cupcake.


2. Remove one cherry from the preserves and place it into the cupcake. Gently press it into place with your finger.
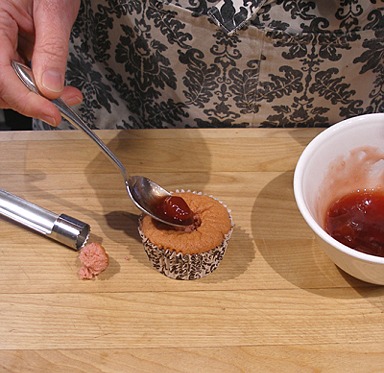
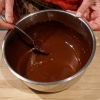
3. Stir the Chocolate Cake Glaze. Fill the rest of the opening in the cupcake with the chocolate glaze.

Frost:
1. Remove the Pink Almond Whipped Cream Frosting from the refrigerator. Refluff, if necessary, with a few beats of a large balloon whisk; do not rebeat.
2. Place Wilton 1M pastry tip in a pastry bag and fill the bag with the stabilized whipped cream.
3. Start by piping all the way around the edge of the cupcake, then spiral the frosting around, ending at the center of the cupcake, forming a peak.


4. Fill a small medicine dropper with some Chocolate Cake Glaze and drizzle it over the frosting.
NOTE: I tried pouring it on, and it was too hard to control. I had a baby medicine dropper from when my son was younger, so I decided to try it out. The medicine dropper was the perfect tool for the job!
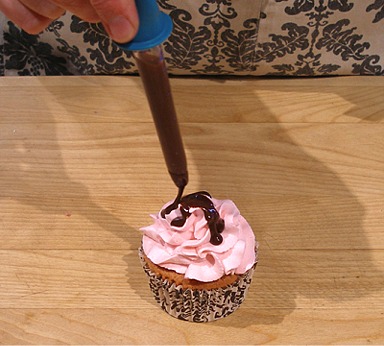
5. Place a Maraschino Cherry in the center of the frosting. Serve immediately.

STORAGE
Cupcake frosting is perishable. Must keep refrigerated where it will keep for a day or two. Does not freeze.
The cupcakes also look pretty without the chocolate drizzle...a perfect cupcake for a princess party.
VARIATION
Blue “Velvet” Chiffon Layer Cake
Other Recipes

Lard Pie Crust
12156 views| 4 comments

Baba al Limoncello
27046 views| 23 comments

Berry Tart with a Cornmeal Crust Tutorial
11365 views| 6 comments
My Recipe Tools
Explore How-Tos

Meringue - Brown or Browning Techniques
The soft type of meringue, or beaten egg whites with sugar, is normally used as a topping for... Read More

Thickeners - Cornstarch
Cornstarch is made from corn, is a fine, white powdery starch ingredient that is used to thicken pie... Read More
Chocolate - Melt
MELTING CHOCOLATE is defined as using indirect heat to convert chocolate from a solid to a... Read More

Toast or Toasting - Nuts
Go to How to Nuts - Toast Read More
Newest Recipes View All

Priscilla’s Fudge Sauce
INGREDIENTS 4 tablespoons unsalted butter 4 ounces bittersweet chocolate, chopped 1 cup sugar 1/2... Read More

Candied Spiced Pink Grapefruit Peels
INGREDIENTS 2 large pink or red grapefruits, preferably organic 1 cup granulated sugar, plus... Read More

Vanilla scented biscuit roulade
About Us

Hi, I'm Sarah Phillips Sarah Phillips, CEO and founder of craftybaking.com, has over 25 years of extensive professional real time baking experience. READ MORE

Hi, I'm Kelly Hong Contributing Editor, Food Stylist and photographer, since 2007. I have been working as a professional ceramic artist for over 25 years. READ MORE